How to make a Paper Gift Card for Any Occasion | Handmade 3D POP-UP Greeting Card DIY
Easy Paper Crafts and Origami Gifts for any Events
Hey there, dear friends! 🙂 Welcome to our blog! Today, we’re going to show you how to make a delightful Paper Gift Card that is perfect for any Occasion 🙂
Whether it’s a birthday, anniversary, or just a simple gesture of love, this handmade 3D POP-UP greeting card will surely bring a smile to anyone’s face. Join us as we dive into the world of easy Paper Crafts and DIY Origami Gifts, and let your creativity soar for all your upcoming events.
Let’s get started on this Fun and Creative project! 🙂
Please scroll down for a step-by-step tutorial of how to make a Paper Gift Card

HERE IS THE TUTORIAL:
List of Supplies:
Tools:
- a pair of scissors
- gel pens or alcohol markers for decoration
- a pencil
- a ruler
Materials:
- colored craft paper
- craft glue
- double-sided duct tape
Follow these easy steps to create a Paper Gift Card:
Prepare a sheet of colored paper measuring 20 by 16 cm (choose the color you like the most).
Place the sheet vertically and draw a line 2 cm from the left edge of the paper.

Draw the sheet with horizontal lines 2 cm apart from each other.

Cut the sheet along the horizontal lines you have just drawn.
Note that the cuts must be made up to the vertical line.

You may also like other ORIGAMI crafts from our collection 🙂
Take an A4 sheet of colored paper and fold it in half.
We recommend using a thicker craft paper or cardboard for this purpose.
Unfold the sheet to its original position.

Now, you should glue the sheets of paper together, following the instructions shown in images below.
To do this, apply glue as shown in the images below and glue the sheets to each other.

You may also like: How to make a Greeting Card for Mother’s Day | Easy DIY Paper Crafts | Best Craft Ideas for Holidays | Handmade Gifts for Different Occasions
Cut out a paper strip measuring 21 by 2 cm and glue it at the crease of the card.

Cut out a paper strip measuring 2 by 10 cm.
Make marks at a distance of 5 mm from the left and right edges of the strip.

Draw lines connecting the corners of the strip to the marks you have just made.

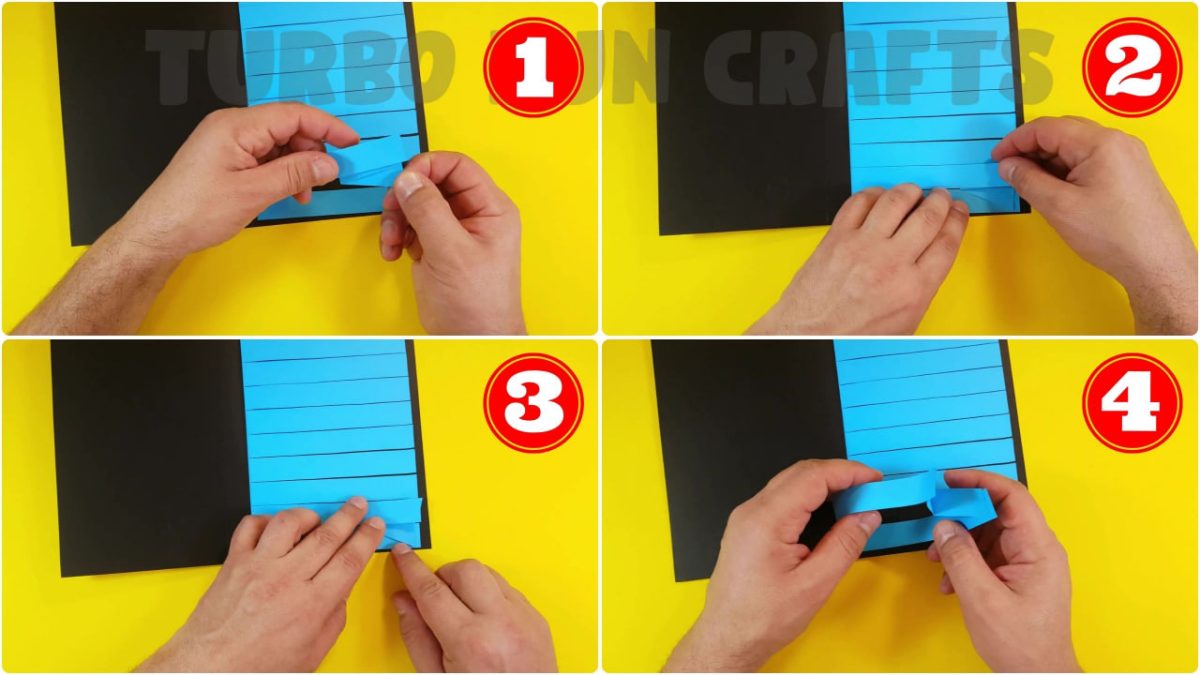
Trim the corners of the strip along the drawn lines and fold it as shown in the images below.
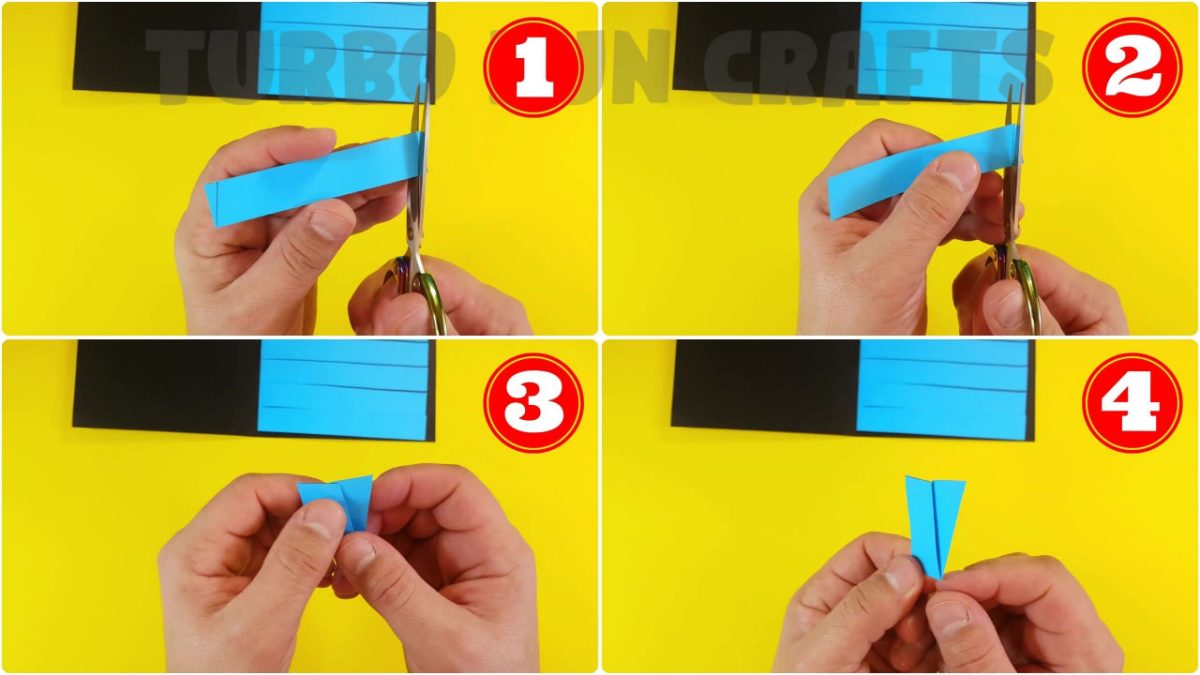
Prepare small pieces of double-sided duct tape, stick them on both sides of the folded strip, and remove the protective paper layer from the tape.
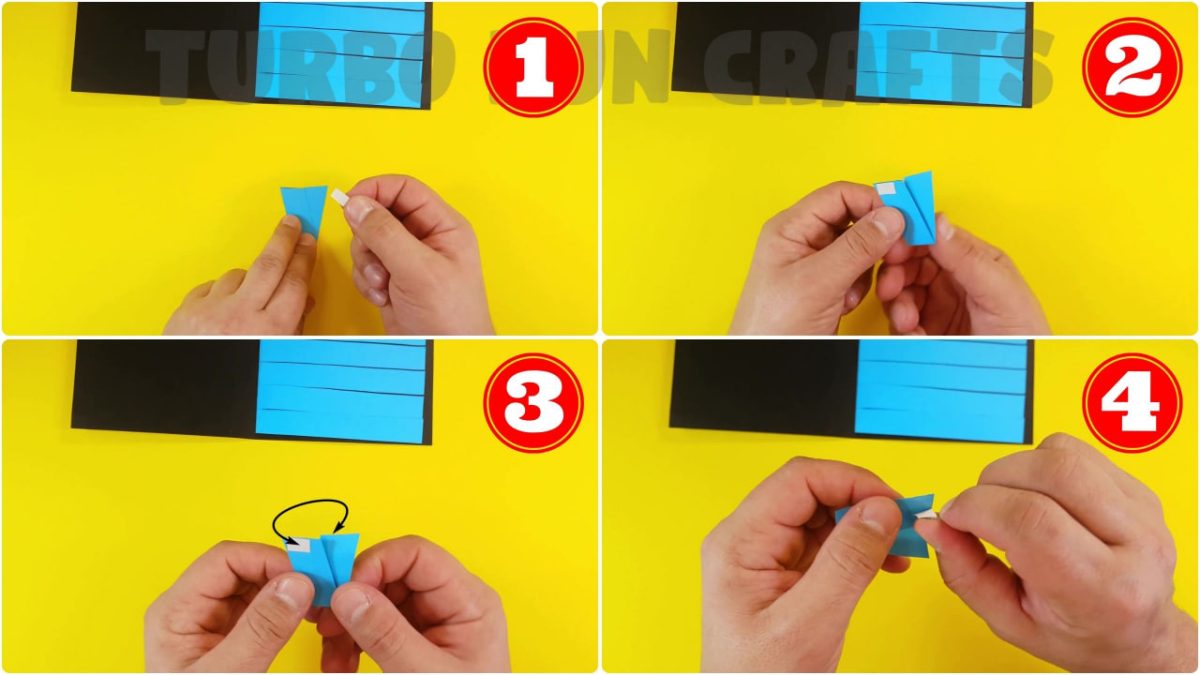
You may also like: How to make Surprise Gift Box with Alphabet Lore | Fun and Creative DIY Personalized Gifts | Alphabet Lore inspired Paper Crafts
Glue the adjacent strips of the sheet to each other using the previously prepared paper piece.
Prepare 8 similarly folded paper pieces.
Glue the paper strips to each other in the same way as shown earlier.
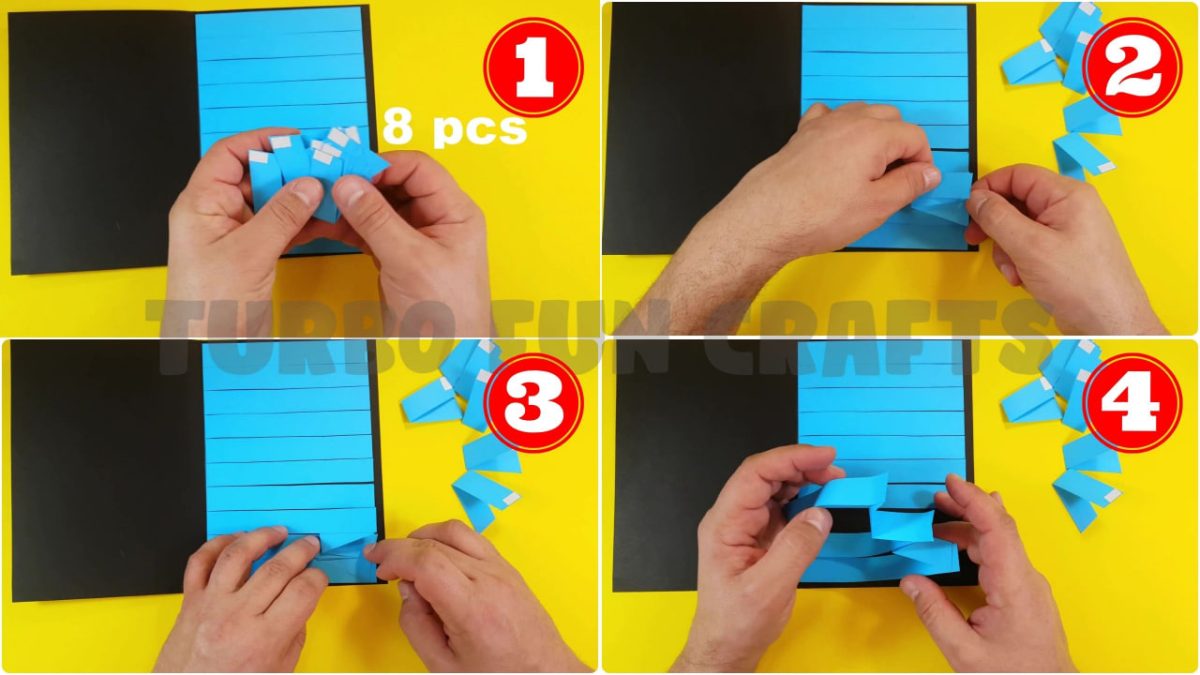
Do the same action with the remaining paper strips.
Tape them to each other in the same way as shown earlier.

Cut a strip of double-sided duct tape and stick it in the specified location on the top edge of the paper. Peel off the protective layer of the tape, then close the gift card and firmly press the paper together.
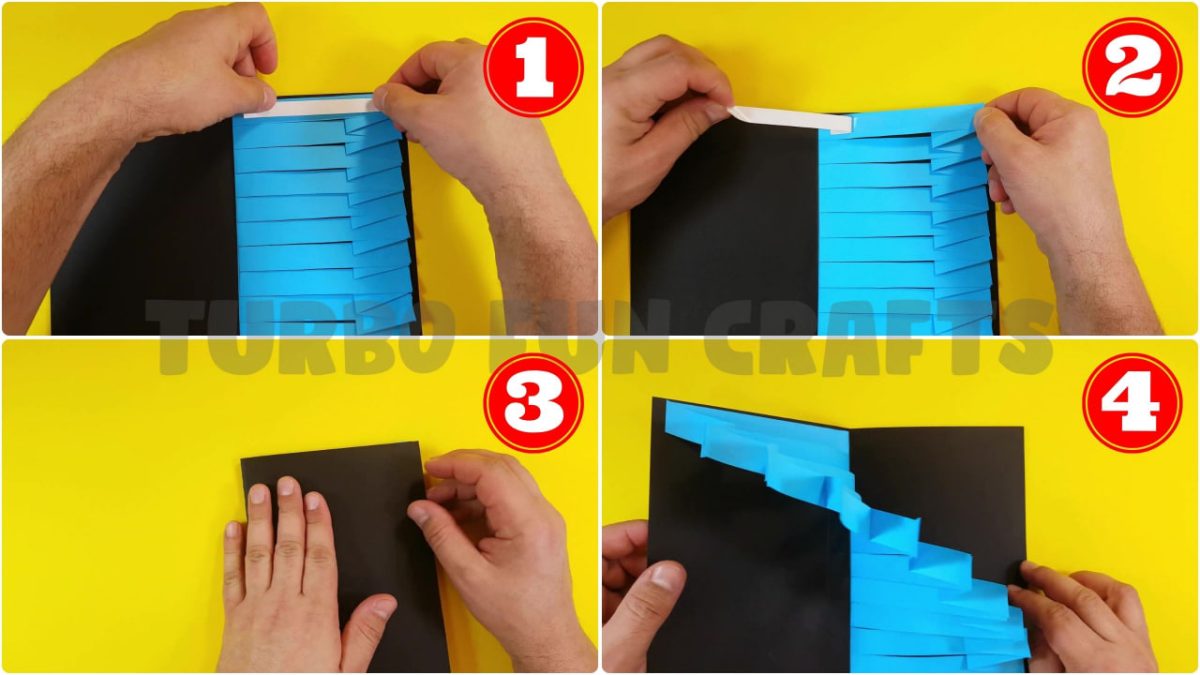
Repeat the same action with the bottom edge of the paper. Cut a strip of double-sided duct tape and stick it in the specified location. Peel off the protective layer of the tape, then close the gift card and firmly press the paper together.

You may also like other HOLIDAYS CRAFTS from our collection 🙂
Now, it’s time to add the finishing touches to the Paper Gift Card.
Decorate it as you wish or use our decorating options.
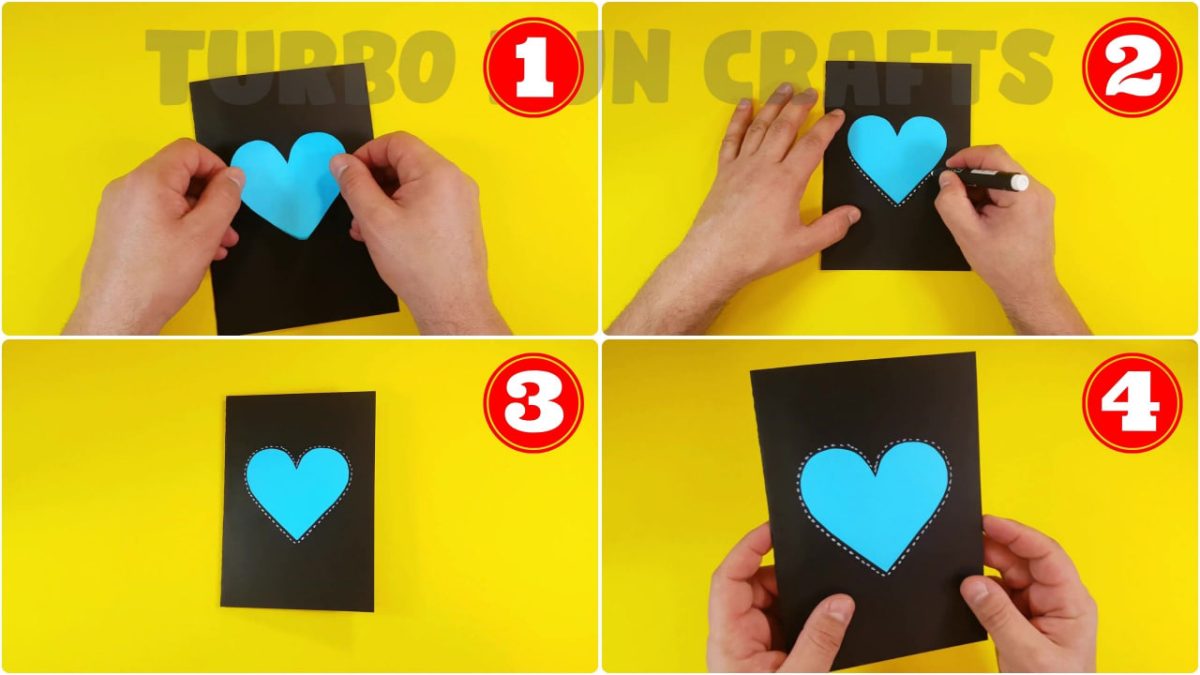
Congratulations!
You have successfully created a Paper Gift Card!
Feel free to decorate it further with any other embellishments to make it even more impressive!
Experiment with colors and let your imagination run wild!
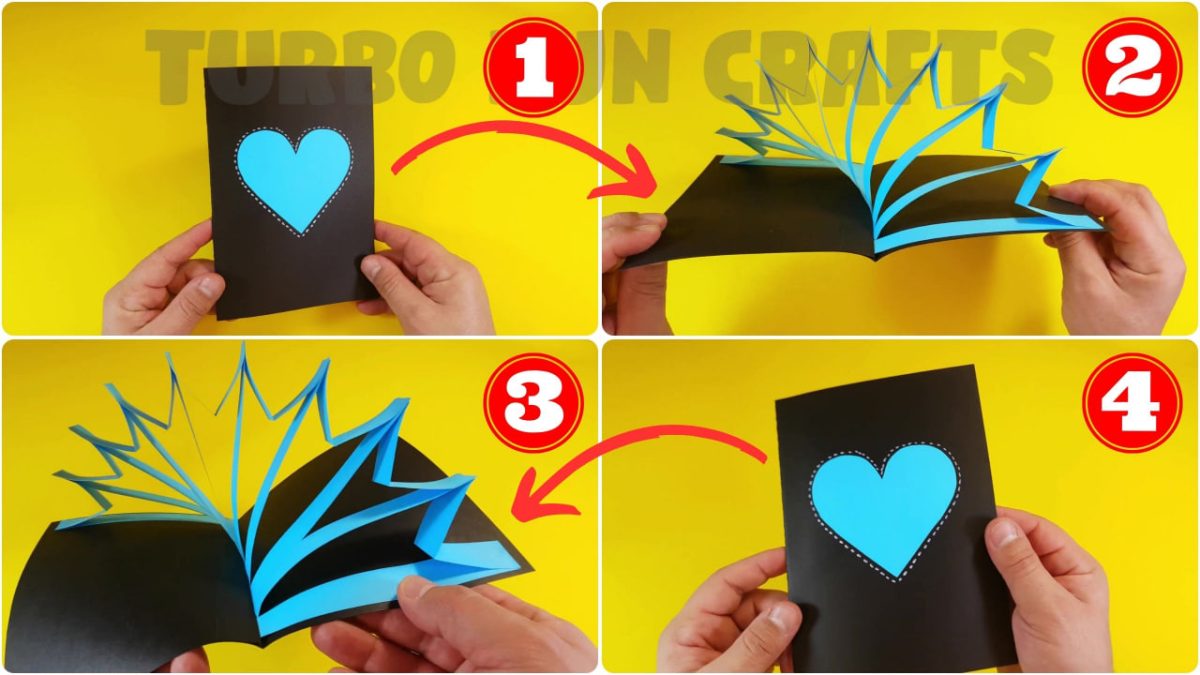
Creating a handmade 3D POP-UP paper gift card is a delightful and thoughtful way to express your feelings on any occasion. Crafting a paper gift card allows you to unleash your creativity, offering the freedom to choose colors, patterns, and pop-up designs to make it truly unique. Unlike store-bought cards, your DIY paper gift card lets you convey personalized and meaningful sentiments, whether through heartfelt messages or inside jokes that bring smiles.
If you experienced difficulties with some steps, you can watch the video instruction on how to make a Paper Gift Card
Please scroll down for the video tutorial 🙂
Moreover, these handmade cards become cherished keepsakes, reminding recipients of your thoughtfulness for years to come. Crafting your own 3D pop-up gift card can be cost-effective, requiring only basic materials like paper, glue, and scissors. Furthermore, the versatility of handmade paper cards means you can adapt them to any occasion, from birthdays and anniversaries to Valentine’s Day and ‘thinking of you’ moments. They’re also environmentally friendly, promoting eco-conscious living through the use of recyclable and sustainable materials.
Furthermore, the unique 3D effect of these cards adds a ‘wow’ factor that surprises and captivates the recipient, setting your gift card apart from the rest. Crafting a gift card can be a fun bonding activity, involving family and friends to create shared memories and strengthen relationships. It also showcases the time and care you invest in the process, demonstrating your willingness to go the extra mile to make your loved ones feel special.
Customization options are endless, whether adding intricate origami details or personalizing with photos, stickers, or embellishments. In conclusion, making a 3D POP-UP paper gift card is a heartfelt gesture that brings joy and cherished memories to both the creator and the recipient. Embrace the world of paper crafts and let your creative spirit shine on any occasion.


