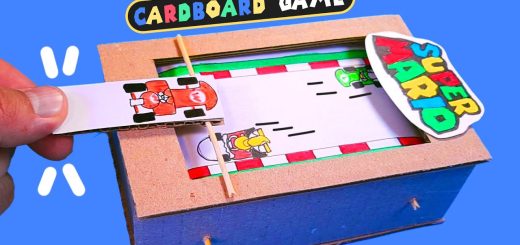
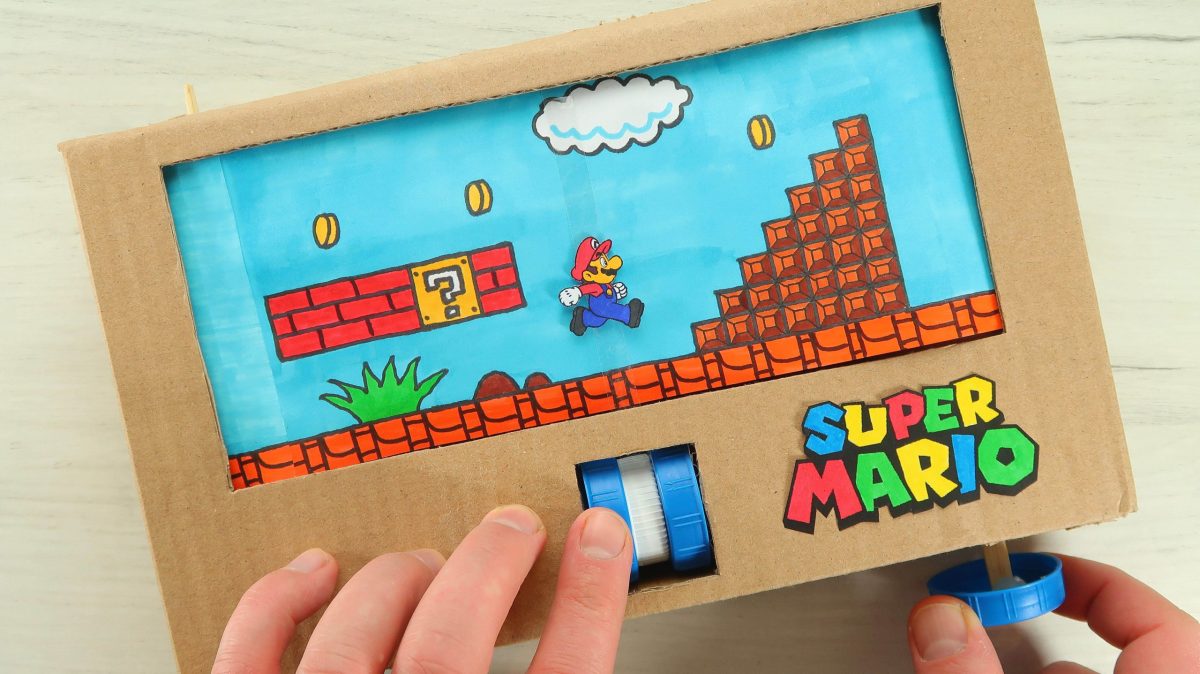
How to make Cardboard Game Super Mario | No electronic components required | Anyone can make
Hello everyone! 🙂 Explore the thrilling world of Super Mario by crafting your very own Cardboard Game Super Mario, without the need for any electronic components.
This DIY Cardboard project is a great way to bring the joy of a game into your home, and it’s a perfect activity for people of all ages. 🙂
Our step-by-step tutorial takes you through each stage of the process of making Cardboard Game Super Mario, from designing and cutting the cardboard to assembling and decorating the game.
Now, let’s begin! 🙂
Please scroll down for a step-by-step tutorial of how to make Cardboard Game Super Mario
HERE IS THE TUTORIAL:
You will need the following materials:
- porous two-layer cardboard
- a sheet of white paper A4
- chopsticks
- 2 toilet paper rolls
- 4 plastic bottle caps (we used ones with a diameter of 4 cm)
- 1 plastic bottle cap (any diameter less than 4 cm)
- wooden sticks
- double-sided duct tape
- duct tape
- stapler
- tweezers
- glue gun
- rubber bands
- pencil
- alcohol markers (choose colors as desired)
- scissors
- ruler
- pliers
STEP 1: How to Make a Cardboard Game Super Mario
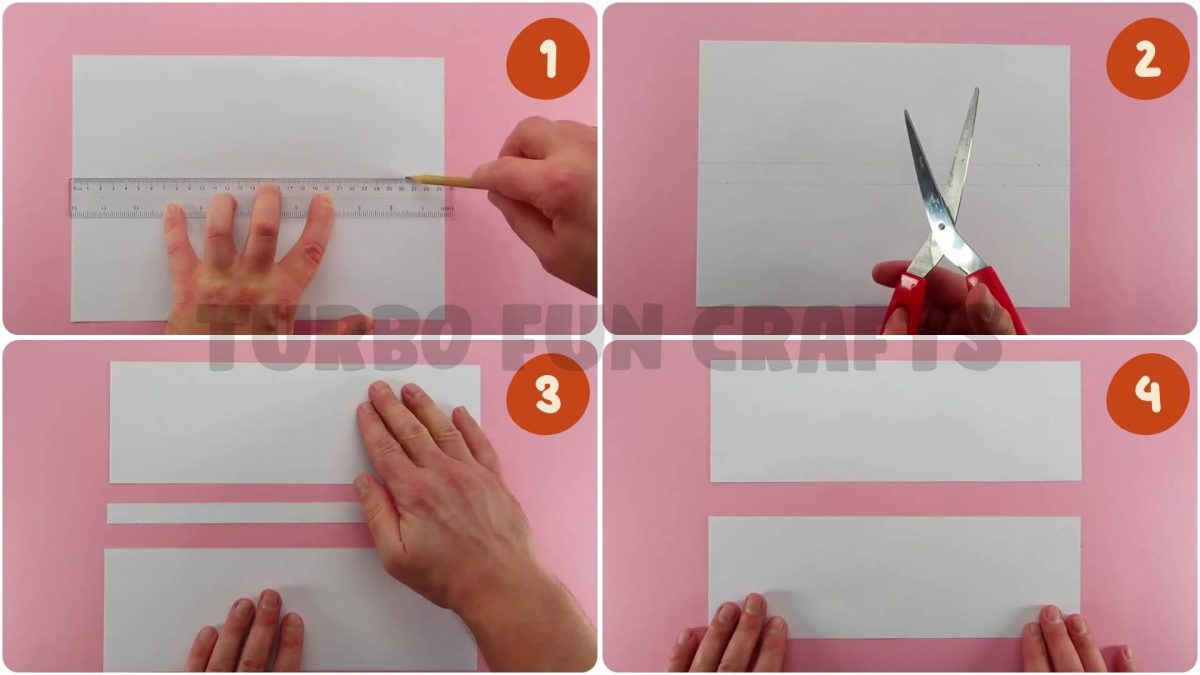
Take a standard white A4 paper sheet. You will also need a toilet paper roll, a ruler, and a pencil. Measure the length of the toilet paper roll using the ruler. In our tutorial, we used a toilet paper roll that was 9.7 cm long. Using a ruler and a pencil, measure a distance of 9.7 cm from the top edge of the sheet on the right and left sides.

Connect the marked points with a horizontal line using the ruler and pencil. Rotate the paper sheet by 180 degrees. Measure a distance of 9.7 cm from the top edge of the sheet on the right and left sides in the same way

Connect the marked points with a horizontal line using the ruler and pencil. Now you will need scissors. Cut the sheet along the drawn lines. Remove the narrow strip of paper.
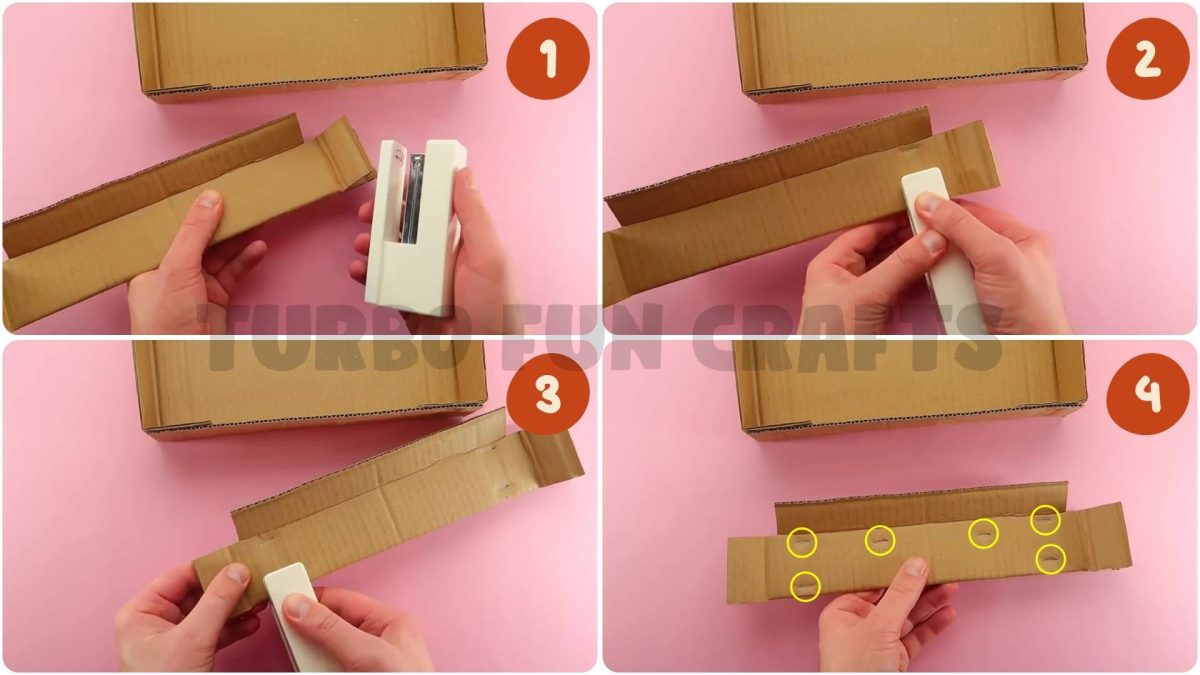
STEP 2: How to Make a Cardboard Game Super Mario
Attach two strips of paper that were just cut out together, using glue (image №1, 2, 3).
Now you need to make a game board. For this, you will need alcohol markers, choose colors as desired. You can style it as you like or use our design option. Allow your imagination to run wild and don’t limit yourself.

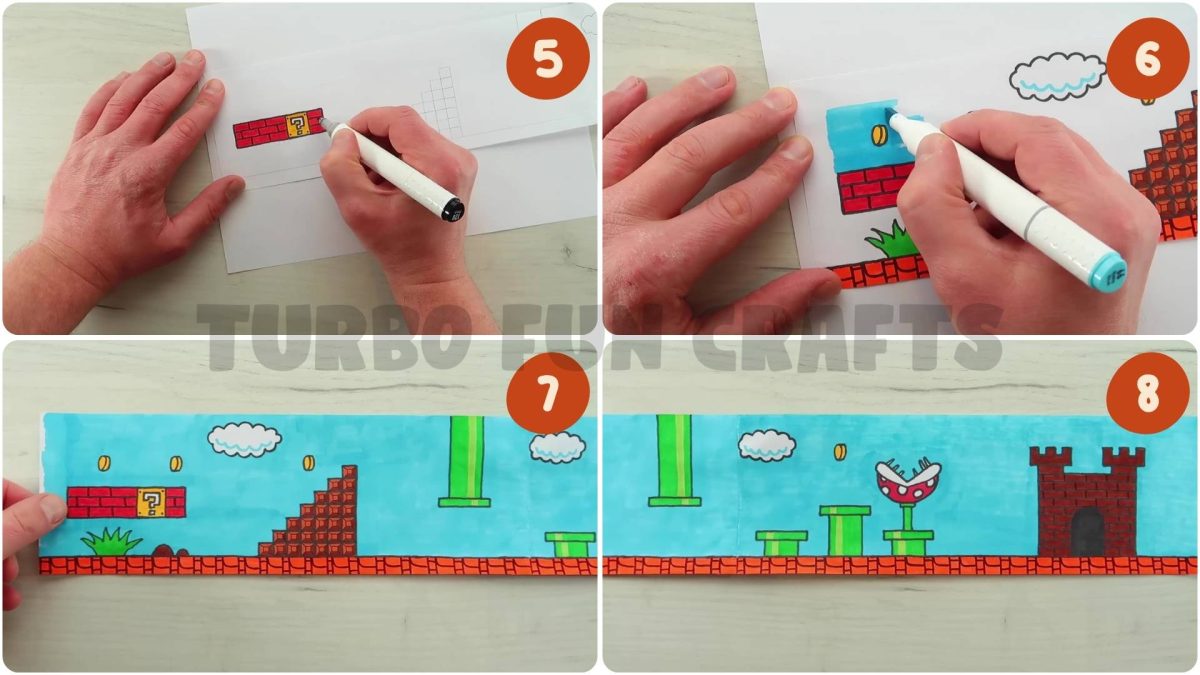
Flip the paper sheet over. Take a sheet of paper and cover the glued strips of paper with it. Now you need to attach the edges of the paper sheet together, using glue.
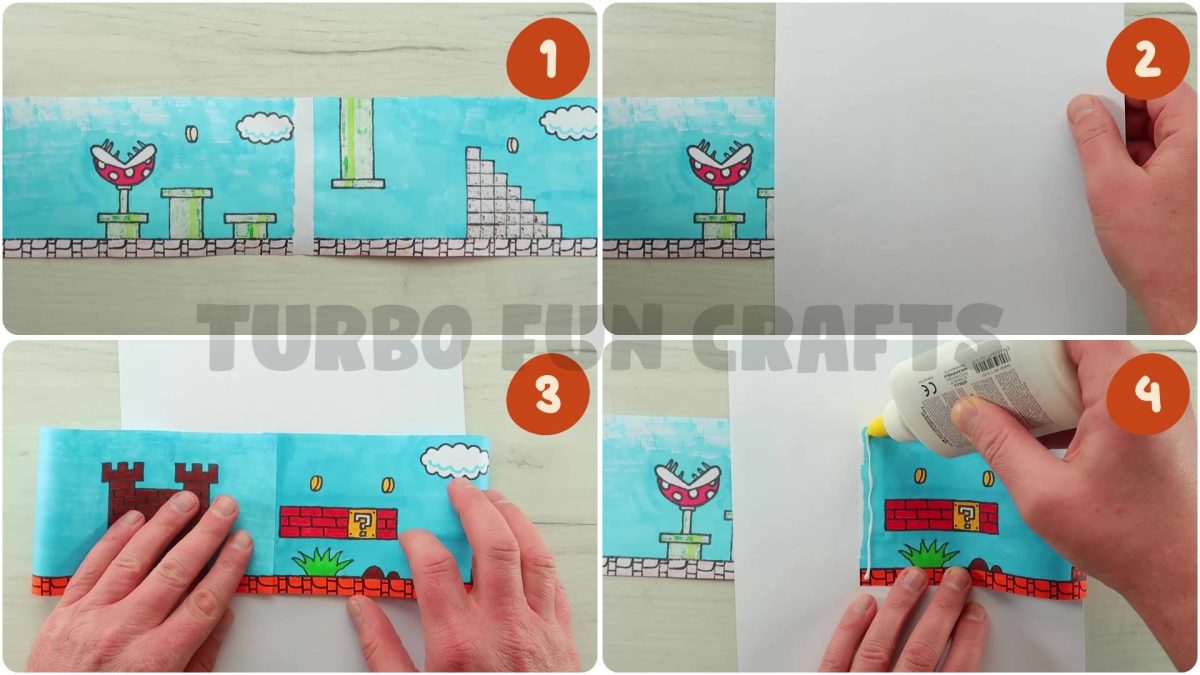
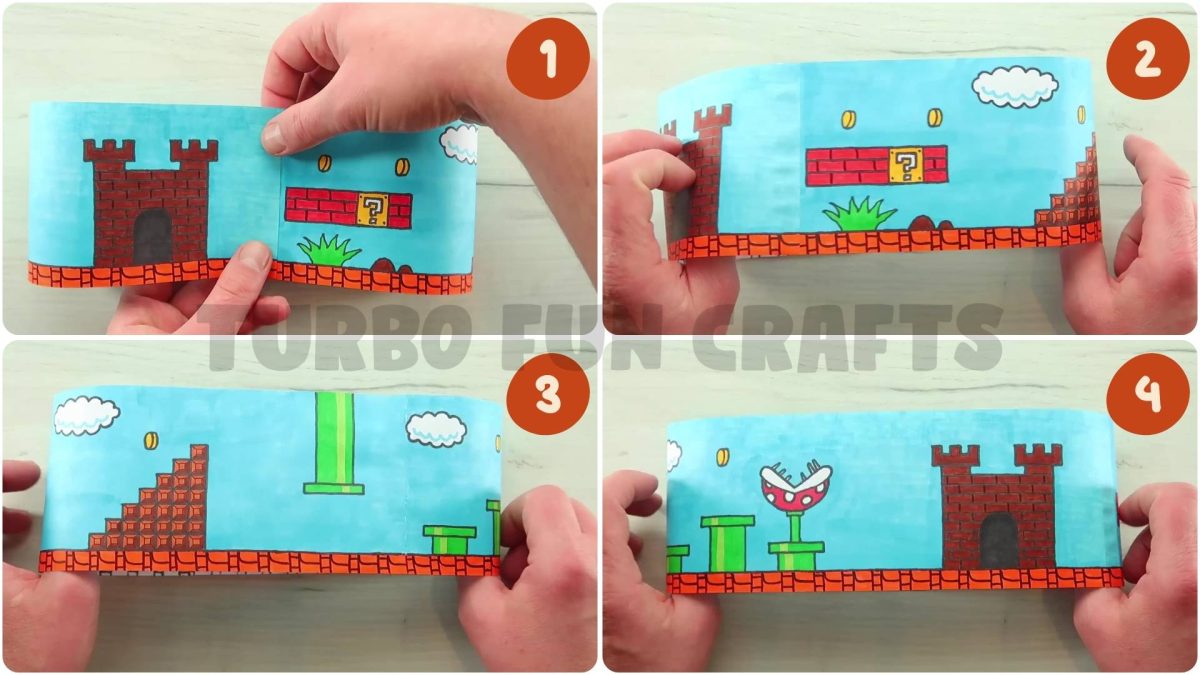
So, the endless game board is ready. Make sure that the paper sheets are securely glued together. This is how it should look like:
STEP 3: How to Make a Cardboard Game Super Mario
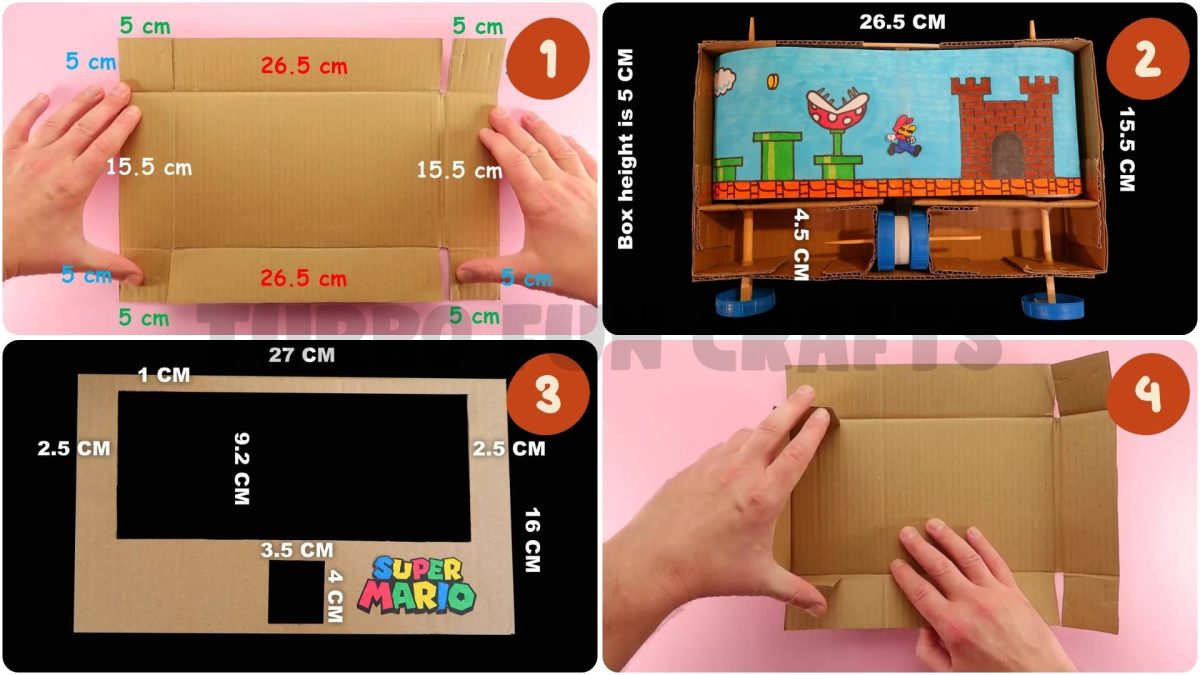
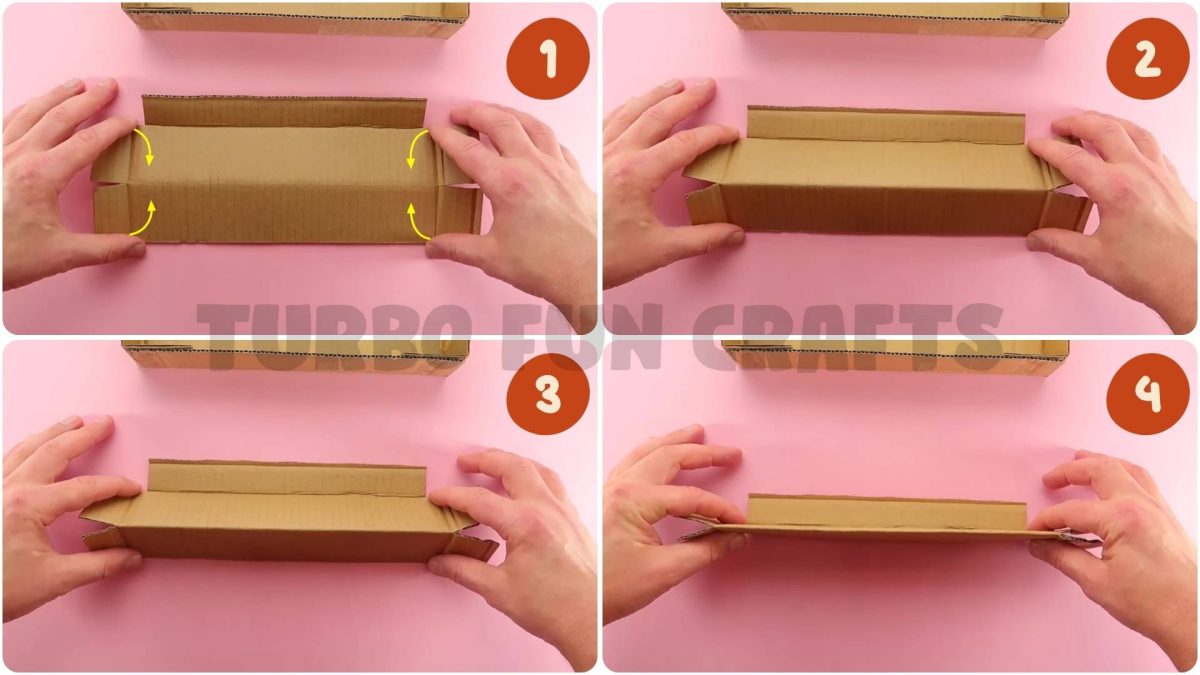
Cut a piece of cardboard to the specified dimensions. For ease of making the game box, use the dimensions shown in the pictures below. Bottom part of the game box (image №2). Top cover of the game box (image №3). Start folding the just cut piece of cardboard as shown in the pictures below. Fold it in the shape of a box.
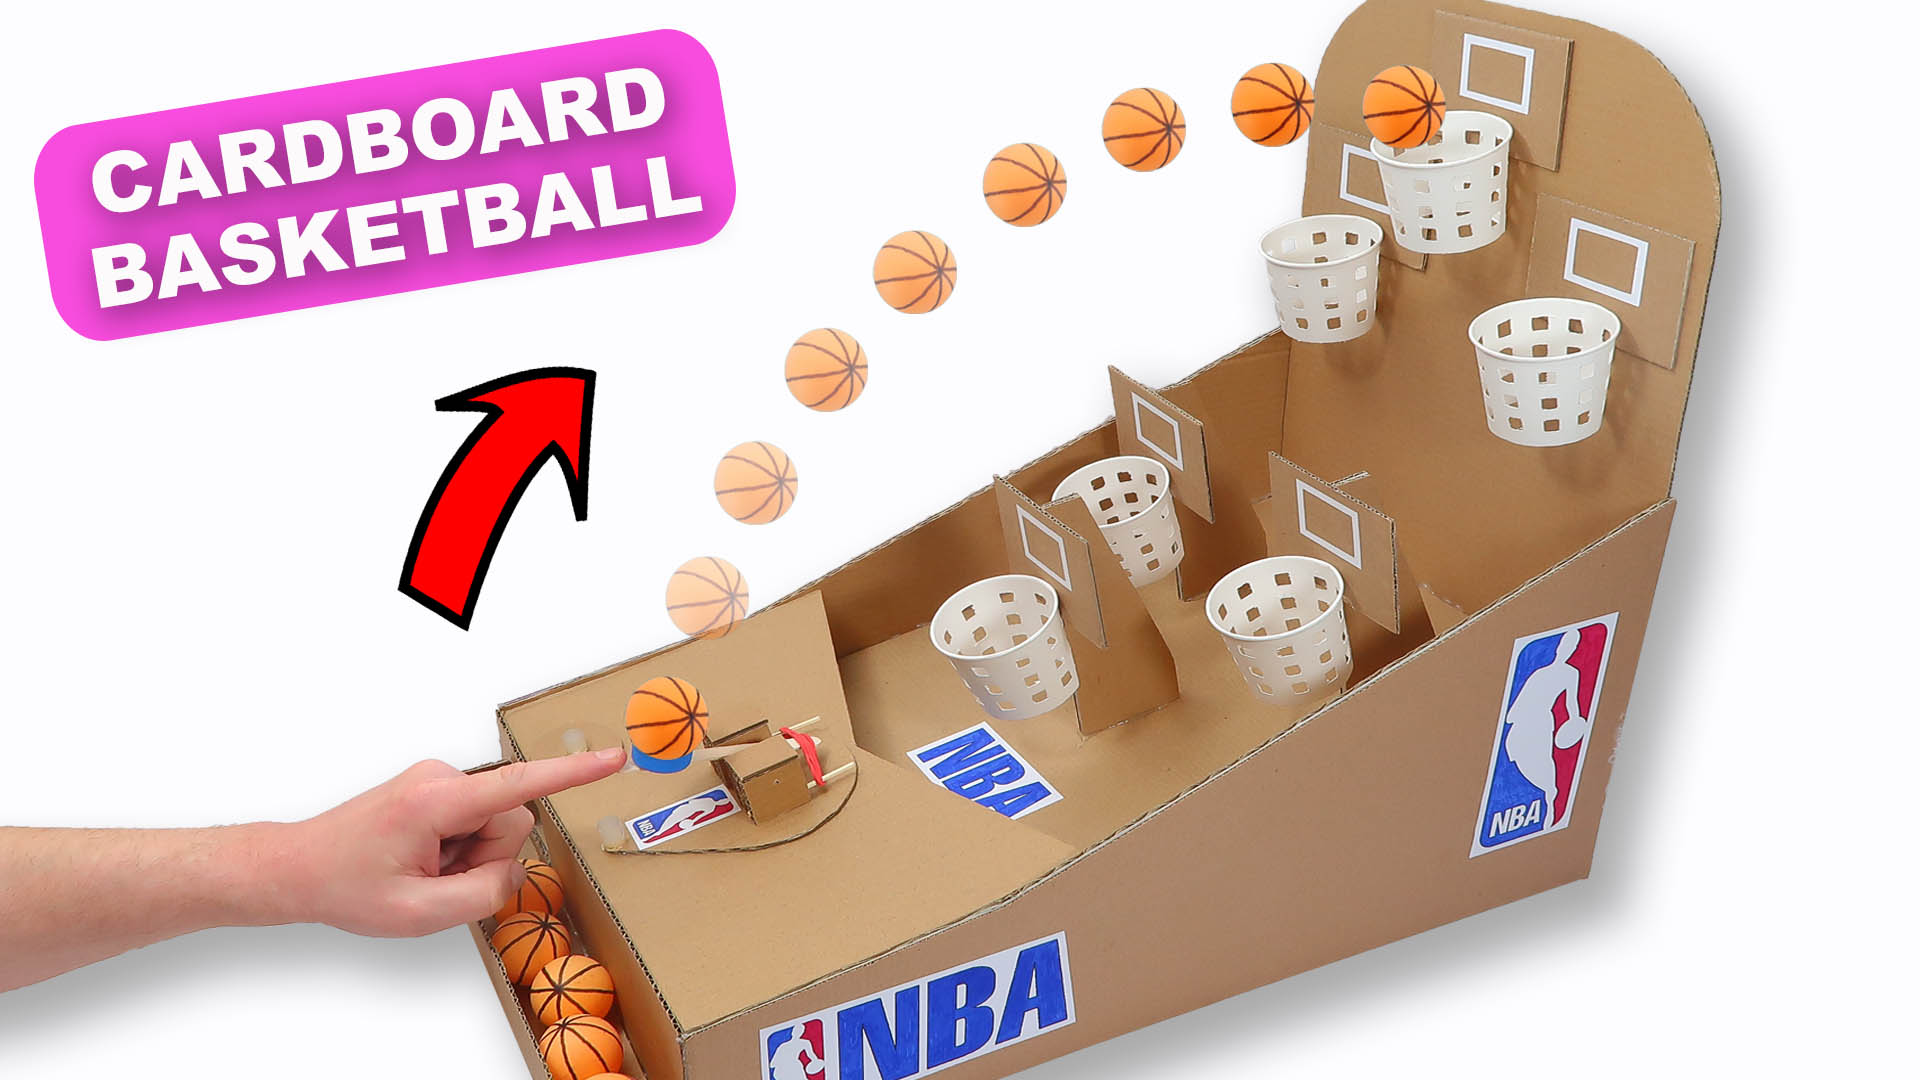
You may also like other CARDBOARD GAMES from our collection 🙂
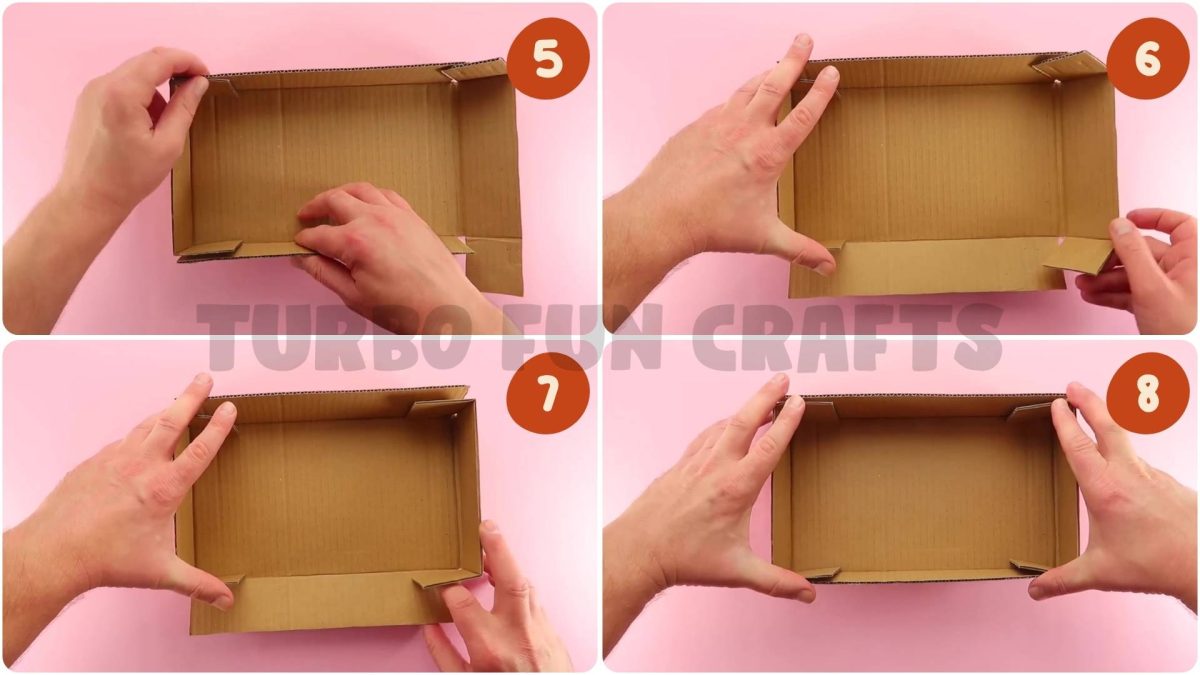
Now you will need a stapler. Staple the top folded corners of the box. Only staple the two specified corners of the box, leaving the other two unstapled. Try to staple the edges of the cardboard as securely as possible. We recommend stapling each corner with two staples for reliability. Staple the second corner in the same way.
STEP 4: How to Make a Cardboard Game Super Mario
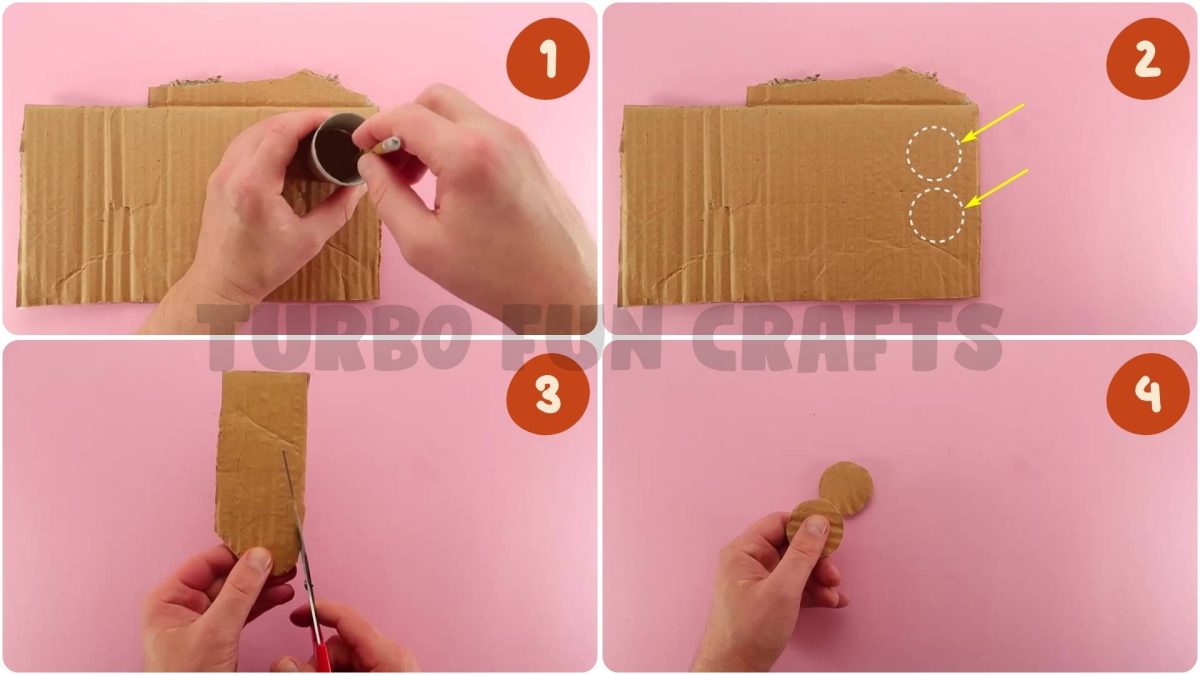
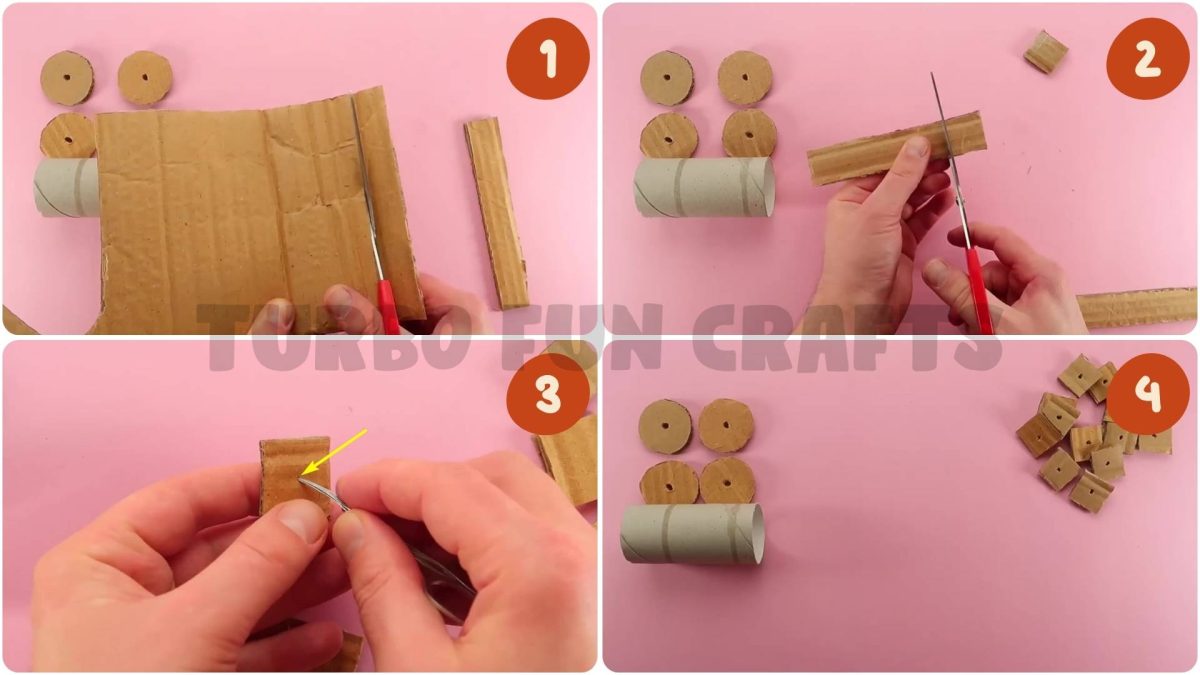
In this step, you will need another piece of cardboard, a pencil, and scissors. Take the piece of cardboard and draw two circles with a pencil that match the shape of the inner side of the toilet paper roll. Cut out the circles from the cardboard using scissors.
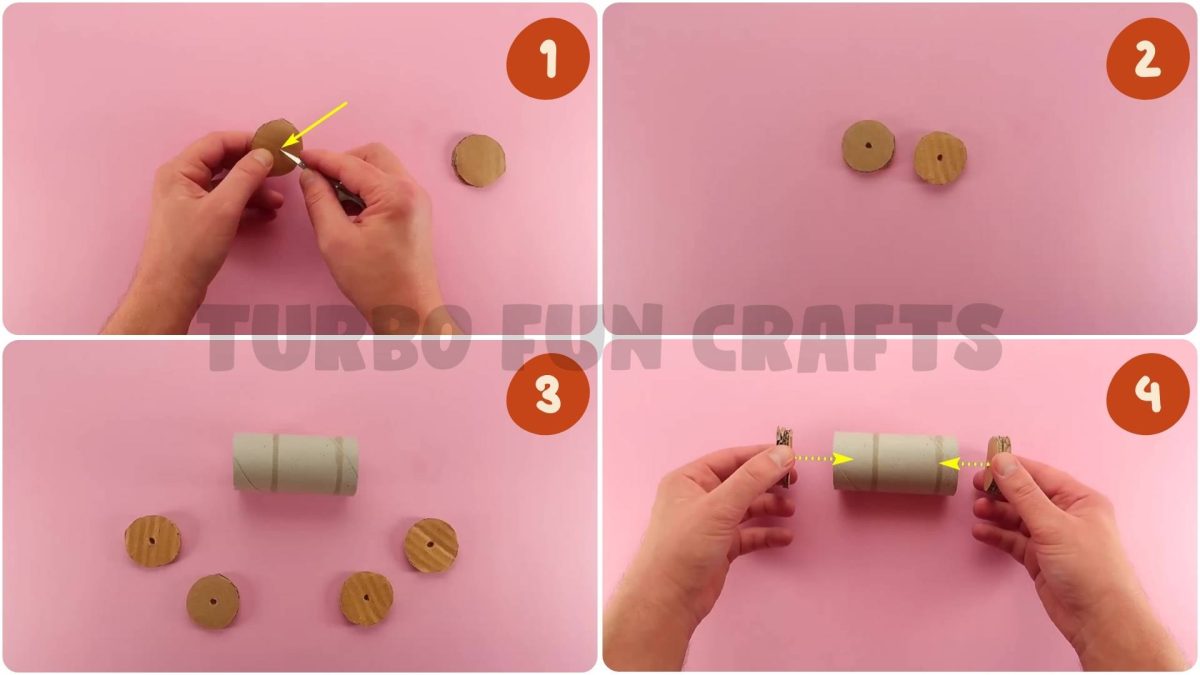
Take the toilet paper roll and insert the just cut circles into it. Make sure that the circles fit properly and do not fall out of the toilet paper roll. Using scissors, make a hole in the center of each circle. Prepare two more circles of the same size. Cut them out of cardboard and make holes in them in the same way. We will need these circles in the future. They will be inserted into the toilet paper roll with two circles on each side (shown in the image №4).
Now you will need cardboard again. Cut two cardboard strips about 2 cm wide from it. Using scissors, cut both strips into squares about 2 cm by 2 cm in size. Using scissors, make a hole in the center of each previously cut square.
STEP 5: How to Make a Cardboard Game Super Mario
In this step, you will need chopsticks. Each chopstick will be placed inside the toilet paper roll. Here’s how it will look like:
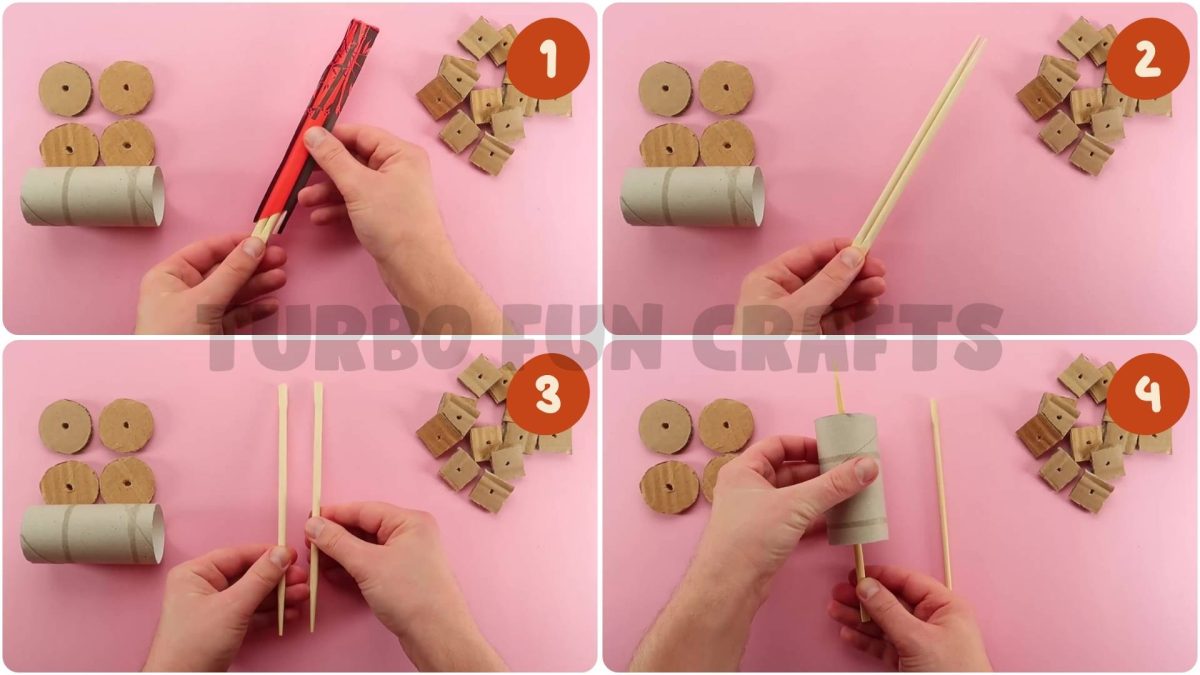
Take two cardboard circles cut earlier and put them on the chopstick. Put the toilet paper roll on the chopstick as shown in the picture below:

Now, you need to put the previously cut cardboard squares on the chopstick. Start putting them on the tapered end of the chopstick. You need to prepare enough squares to fill all the internal space of the toilet paper roll. However, when putting the squares, make sure there is enough space left for the two remaining cardboard circles. After the squares are on the chopstick, close the open edge with two previously cut cardboard circles.
Attention!! Make sure that the cardboard circles on the chopstick do not fall inside the toilet paper roll. If necessary, cut additional squares and add them to the ones already put inside the toilet paper roll
STEP 6: How to Make a Cardboard Game Super Mario
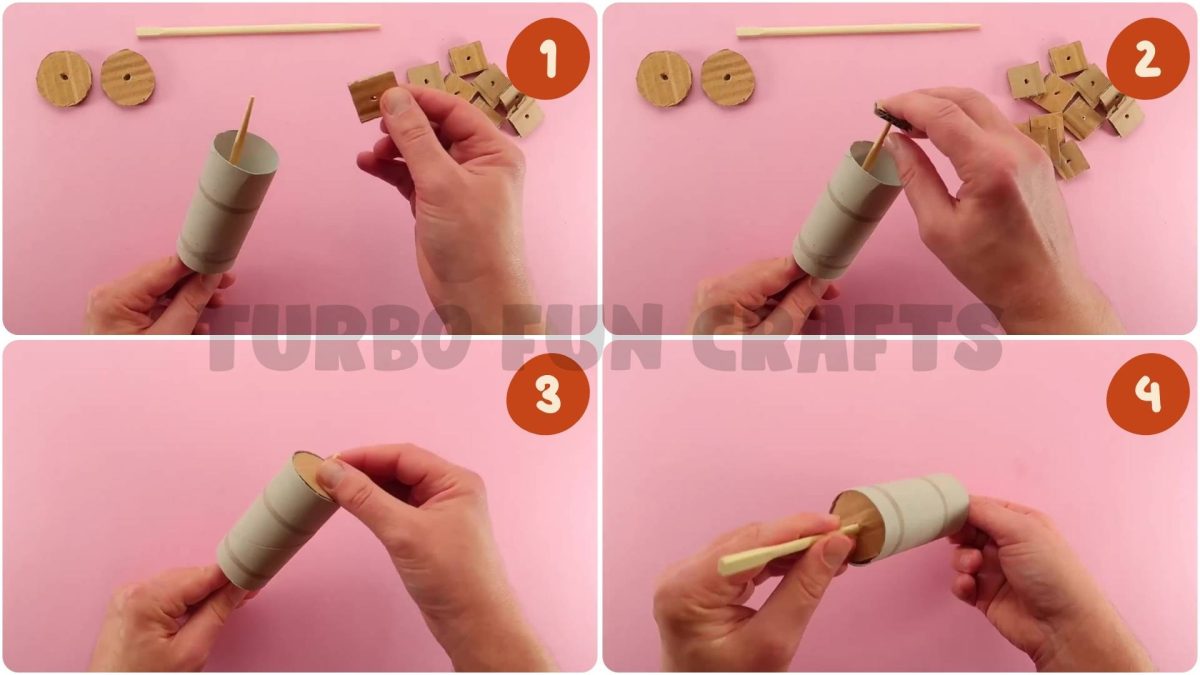
In this step, you will need to cut out a piece of cardboard with the required shape and size. The dimensions and shape are indicated in the picture below (image №1). Pay attention to the edges of the cardboard, they need to be folded along the dotted lines. This can be done using a ruler. The folded edges on the sides and top should move freely. This is necessary to secure this piece of cardboard in the body of the game. The necessary folding lines are shown in the picture below:

Start folding the piece of cardboard as shown in the pictures below:
Now you will need a stapler. Secure the shape of the folded cardboard piece with a stapler. We recommend using six staples to connect the edges. This is how it should look like:
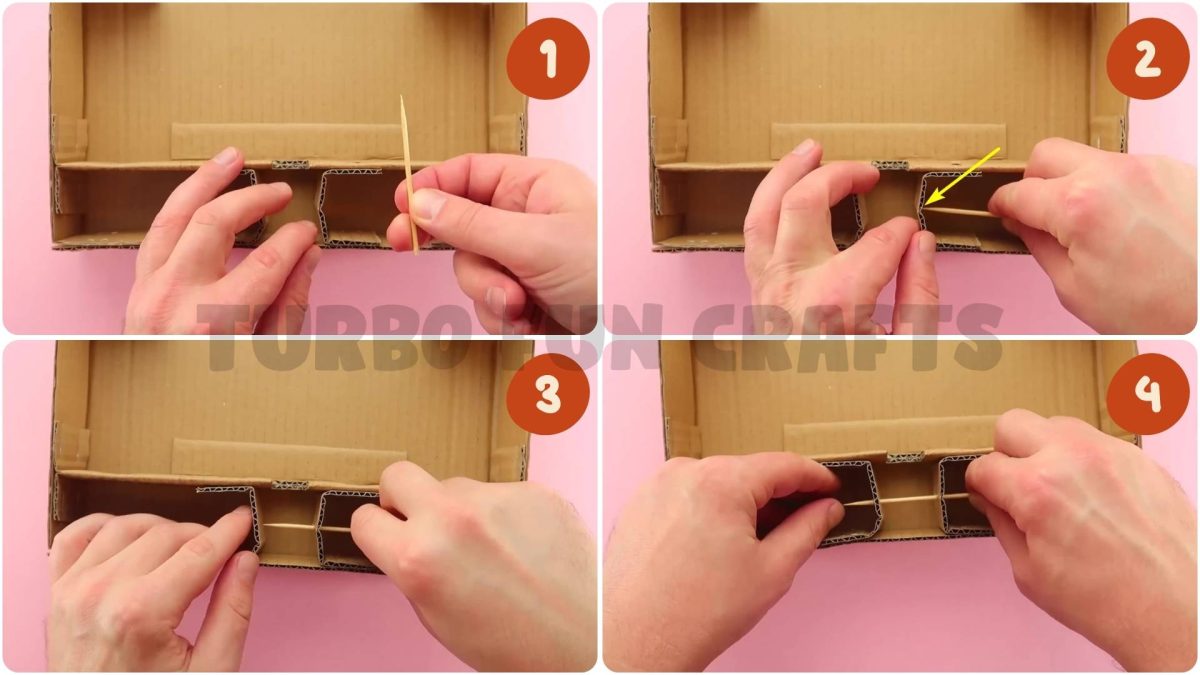
STEP 7: How to Make a Cardboard Game Super Mario
Take a pencil and draw a square on the newly folded piece of cardboard. The required size of the square is 2 by 2 cm. Cut out the square you just drew using scissors. This is how it should look like:

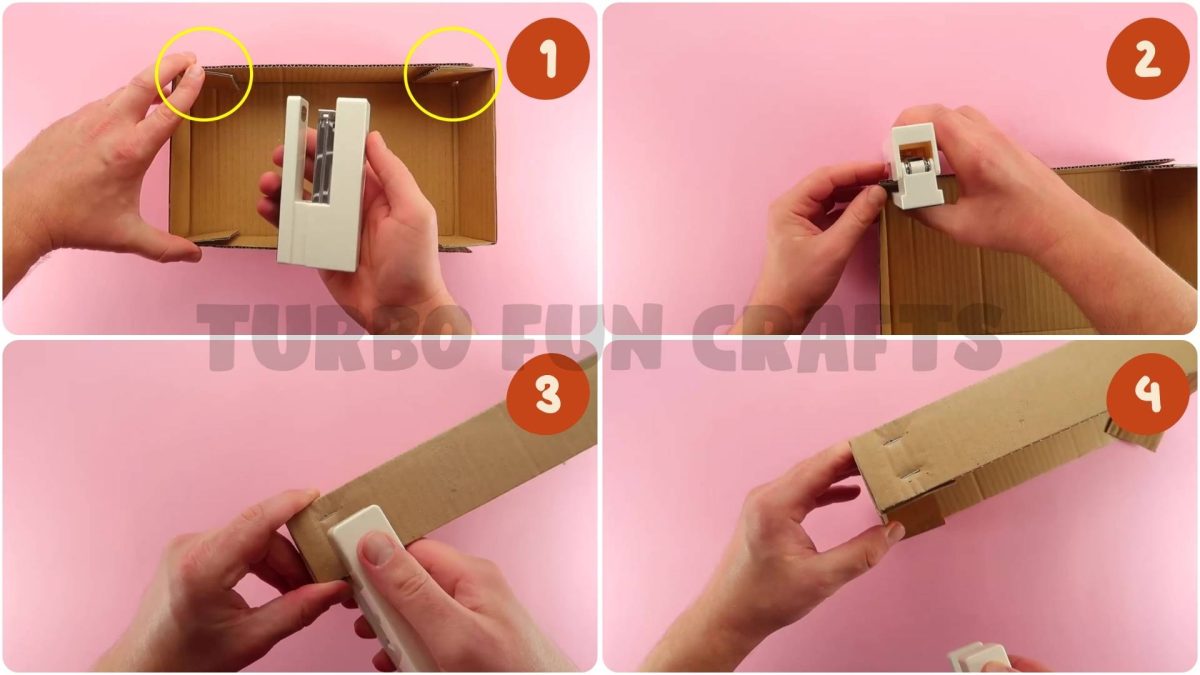
Take the box prepared in “STEP 3” and make sure that only two corners are fastened with staples (shown in the image №1). If necessary, remove the staples so that two corners are not fastened.
Without changing the position of the box, fold the two unstapled corners. Place the toilet paper roll inside the box closer to one of the unstapled corners. Insert the previously prepared piece of cardboard into the box. Place the second toilet paper roll inside the box. This is how it should look like:

Take the prepared milk bottle cap. Make sure that the cap fits freely between the edge of the box and the previously inserted piece of cardboard. The distance between the edge of the box and the piece of cardboard should be 4.5 cm. Take a ruler and measure the diameter of the milk bottle cap. In our tutorial, we used a cap with a diameter of 4 cm. Cut out a piece of cardboard according to the dimensions shown in image №3. Take a ruler and fold the piece of cardboard along the dashed lines (images № 4, 5, 6, 7). Cut out another piece of cardboard of the same size. Fold its edges in the same way.

You may also like: How to make Super Mario Cardboard Game | No electronic components required | Super Mario-inspired Paper Crafts

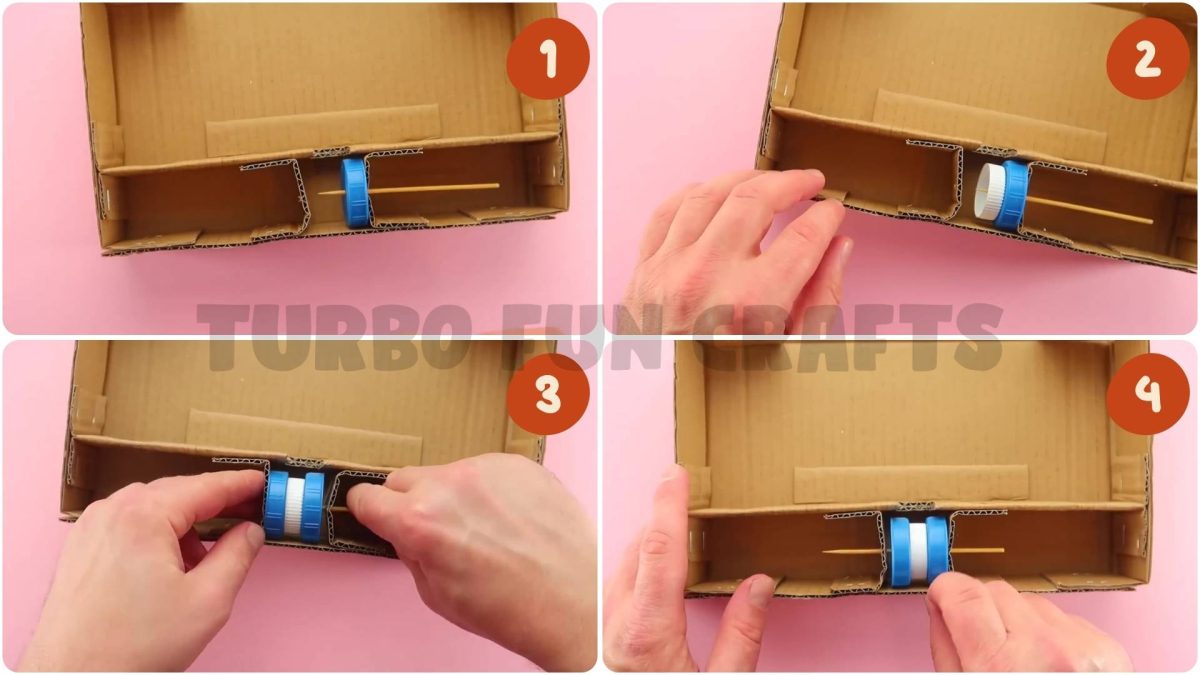
STEP 8: How to Make a Cardboard Game Super Mario
Insert the just cut cardboard pieces into the box as shown in the image №1. Take the bottle caps and use scissors to make a hole in the center of each (images № 2, 3, 4).

Take the wooden stick with a tapered end and put the caps on it. This is shown in the images below:

Make sure that the stick with the caps fits freely between the pieces of cardboard that were previously inserted into the box. If everything is okay, staple the cardboard pieces to the box in the selected areas shown in the image №2.

STEP 9: How to Make a Cardboard Game Super Mario
Take the wooden stick with the tapered end. Insert it into the cardboard at the designated place shown in the image №2, closer to the top of the piece of cardboard. Insert it through both pieces of cardboard.
Now you will need the caps that were prepared earlier. Insert the stick with a tapered end into one of the holes in the cardboard and put on it a larger diameter cap, as shown in the image №1. Put the second cap, which has a smaller diameter, on the stick as shown in the image №2. Put the third cap, which has a larger diameter, on the stick as shown in the image №3. After all three caps are on the stick, insert the stick into the prepared hole in the second piece of cardboard. Spin the caps on the stick to ensure that they move freely.
You may also like HOLIDAY IDEAS from our collection 🙂
Take a toilet paper roll and place it into the box. Using a pencil, mark the center of the toilet paper roll onto a piece of cardboard as shown in the image №1. Mark the center of the toilet paper roll on the bottom of the box at the designated location, as shown in the image №2. Take the toilet paper roll and insert the cardboard circle prepared in “STEP 4” into it. Using a ruler, measure the distance from the edge of the toilet paper roll to the hole in the cardboard circle (image №3). In our tutorial, this distance is 2.25 cm. Place the box so that the bottom edge is facing up. Take a ruler and mark the measured distance of 2.25 cm on the bottom of the box (image №4). The mark should be made at the same level as the previous mark.
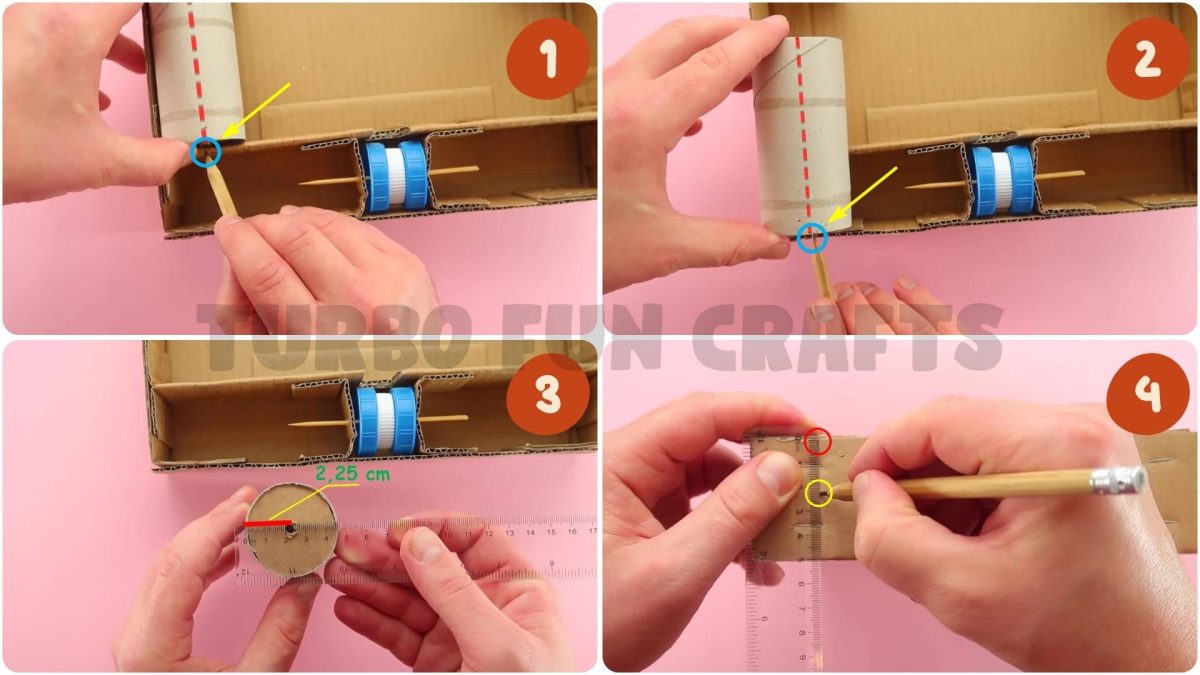
Make sure both marks are at the same level as shown in the image №1.
Use scissors to make a hole at the location of the last mark (image №2). Make a hole in the piece of cardboard inside the box at the same level as the hole just made (image №3). Make the same holes on the other side of the box, as shown in the image №4.

STEP 10: How to Make a Cardboard Game Super Mario
Take two chopsticks and insert them into the holes made in the previous step.

You may also like: How to make Cardboard Game at Home in just 5 Minutes | Easy Tutorial for Everyone | No Electronic Components Required!
Fold the top edge of the cardboard so that it touches the chopstick. Use a pencil to make a mark where the chopstick and cardboard meet. Do the same with the second chopstick. Make holes at the marked places on both sides using scissors.

Insert one of the chopsticks into the prepared holes in the box. Take two cardboard circles previously cut out and put them on the chopstick.

Take a toilet paper roll and put it on the chopstick as shown in the images №1 and №2. Then you will need previously prepared cardboard squares with holes. They will serve as a sealant. Put the necessary number of squares on the chopstick so that the cardboard circles on both sides do not fall inside the toilet paper roll (images №3 and №4).

We also recommend adding hot glue inside the toilet paper rolls to better connect all the squares and circles to the roll and to the chopstick. After filling all the free space inside the toilet paper roll with cardboard squares, put two cardboard circles on the chopstick. Do the same with the second chopstick. Make sure the toilet paper rolls are securely attached and the chopsticks rotate freely. This is how it should look like:

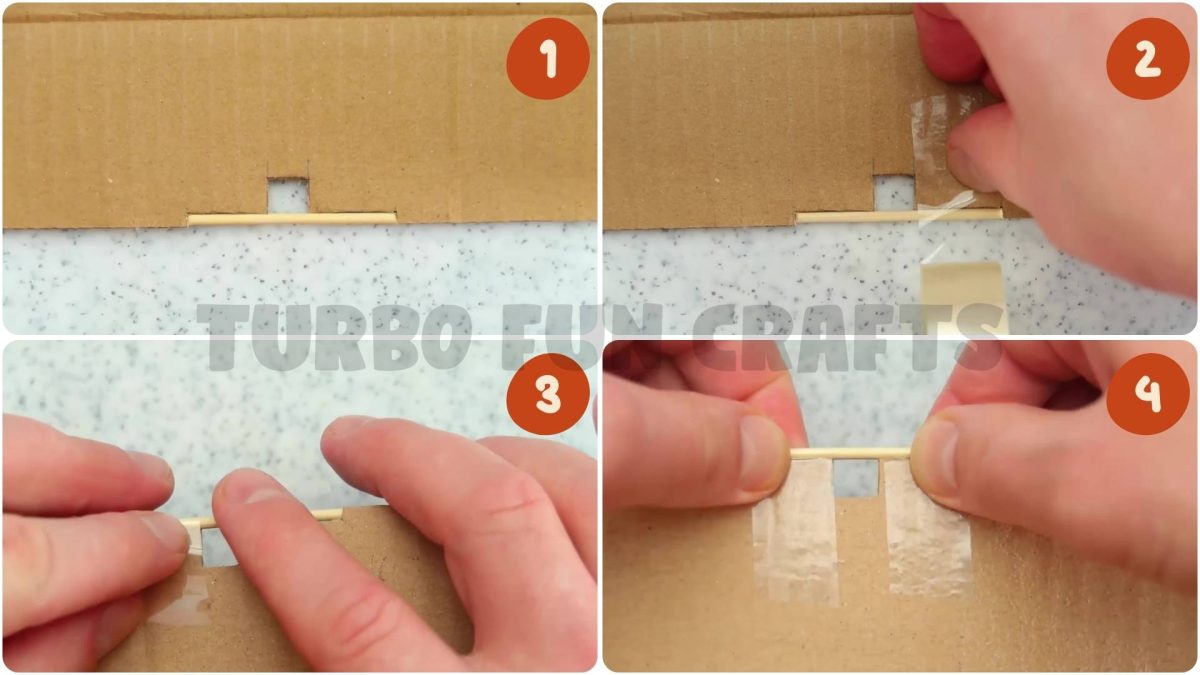
STEP 11: How to Make a Cardboard Game Super Mario
Make a mark at the specified location using a ruler and a pencil. To do this, draw an imaginary line vertically down from where the white and blue caps touch each other (images №1 and №2). Measure the width of the white cap using the ruler. In our case, it is 1 cm. Make a pencil mark, 1 cm away from the previous mark as shown in the image №3. This is how it should look like:

Take a wooden stick and place it at the edge of the cardboard where the marks were made. Measure the thickness of the stick and mark it on the cardboard. Cut out the cardboard along the drawn lines using a paper knife or scissors. Place the wooden stick into the cut-out slot.

Trim it to the desired length using pliers. Use duct tape to attach the stick to the cardboard. Make sure the stick is securely attached to the cardboard.
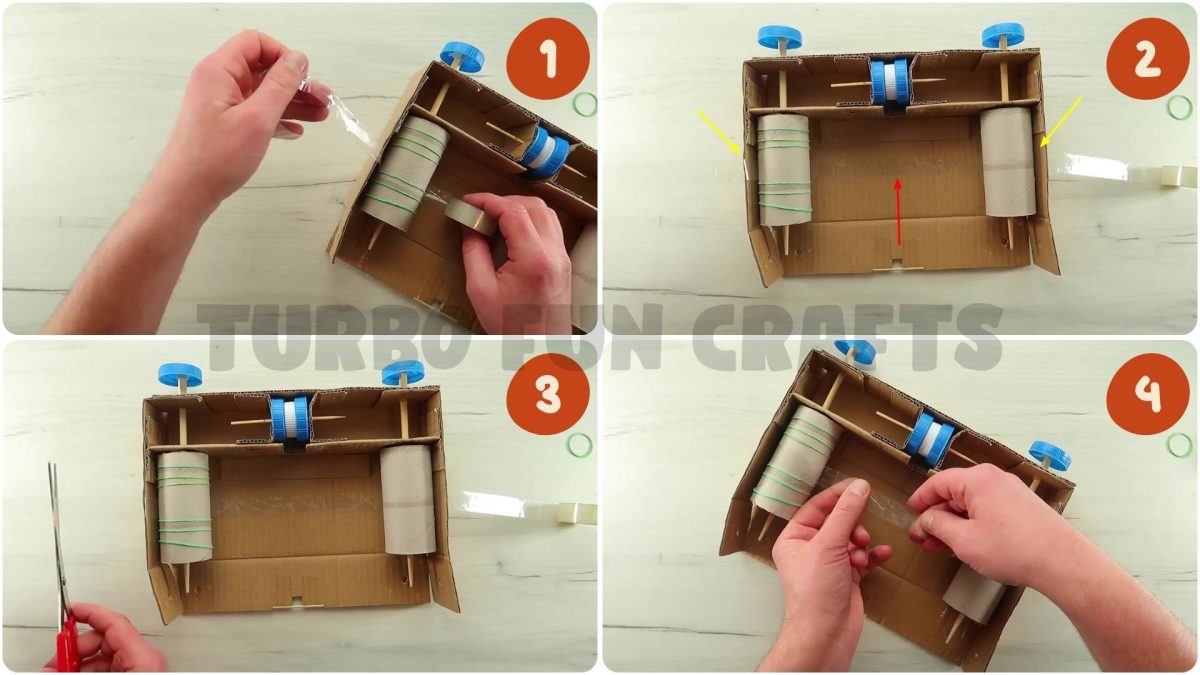
Take rubber bands and put them on the toilet paper roll. In our tutorial, we used six rubber bands – they will help to drive the paper with endless game field (images №1 and №2). Take two milk bottle caps and a glue gun. Attach the caps to the bottom ends of the chopsticks using a glue gun (images №4). These will serve as handles to rotate the moving game board. This is how it should look like:

STEP 12: How to Make a Cardboard Game Super Mario
In this step, you will need to use duct tape. Make sure you have a roll of duct tape on hand before proceeding. Insert it between the toilet paper roll and the edge of the box. The adhesive side of the duct tape should touch the toilet paper roll. Insert the duct tape under both toilet paper rolls, as shown in the images №1 and №2. Cut the ends of the duct tape so that they can be joined and glued together (images №3 and №4).
The duct tape will also help to drive the paper with the game board (image №1). Put the game board onto the toilet paper rolls, as shown in the images №2 and №3. Then you will need double-sided duct tape.
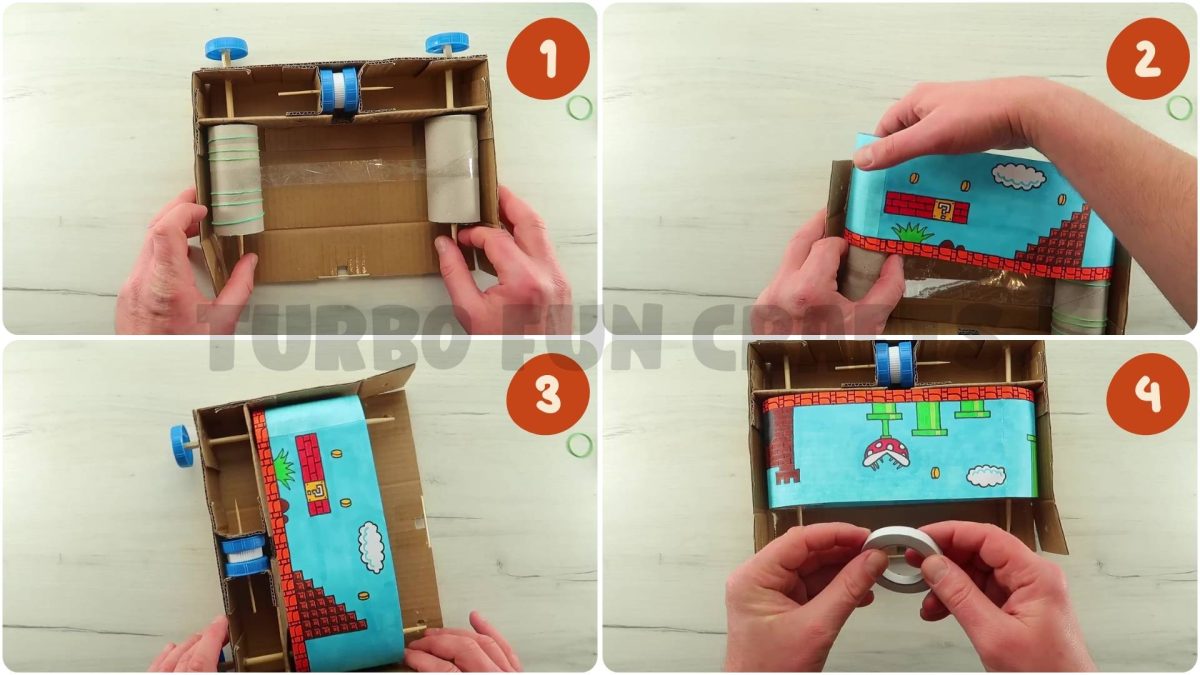
Using scissors, cut 4 strips of double-sided duct tape, each about 4 cm long. Attach them to the cardboard in the designated places (image №1). Remove the protective paper layer from the double-sided duct tape. Rotate the box upside down so that the edge with double-sided duct tape is at the top. Start folding the top edge of the box (images №2, №3 and №4). Insert the tapered end of the stick into the previously prepared holes. This is how it should look like:
You may also like other PARER CRAFTS from our collection 🙂
STEP 13: How to Make a Cardboard Game Super Mario
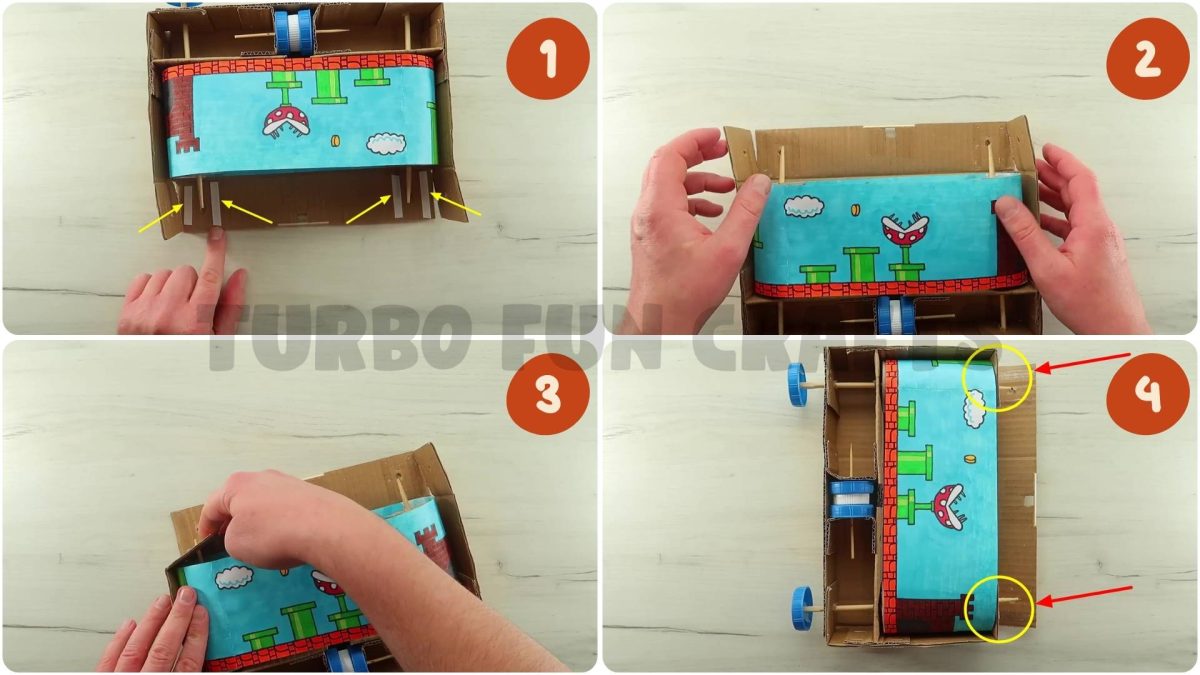
Now you will need narrow duct tape. Note that you need to choose duct tape of such width that it can be inserted into the previously prepared hole, located against the white bottle cap (image №1). You need to insert the duct tape between the white plastic cap and the bottom edge of the box. For convenience, we recommend sticking two strips of duct tape together with the adhesive side to each other. This way you will get a transparent strip without an adhesive side, which will be easier to insert into the box (image №2). For convenience, we used tweezers (image №3). After inserting the duct tape between the plastic cap and the bottom edge of the box, it should be inserted into the slot that has been cut in the cardboard (image №4).
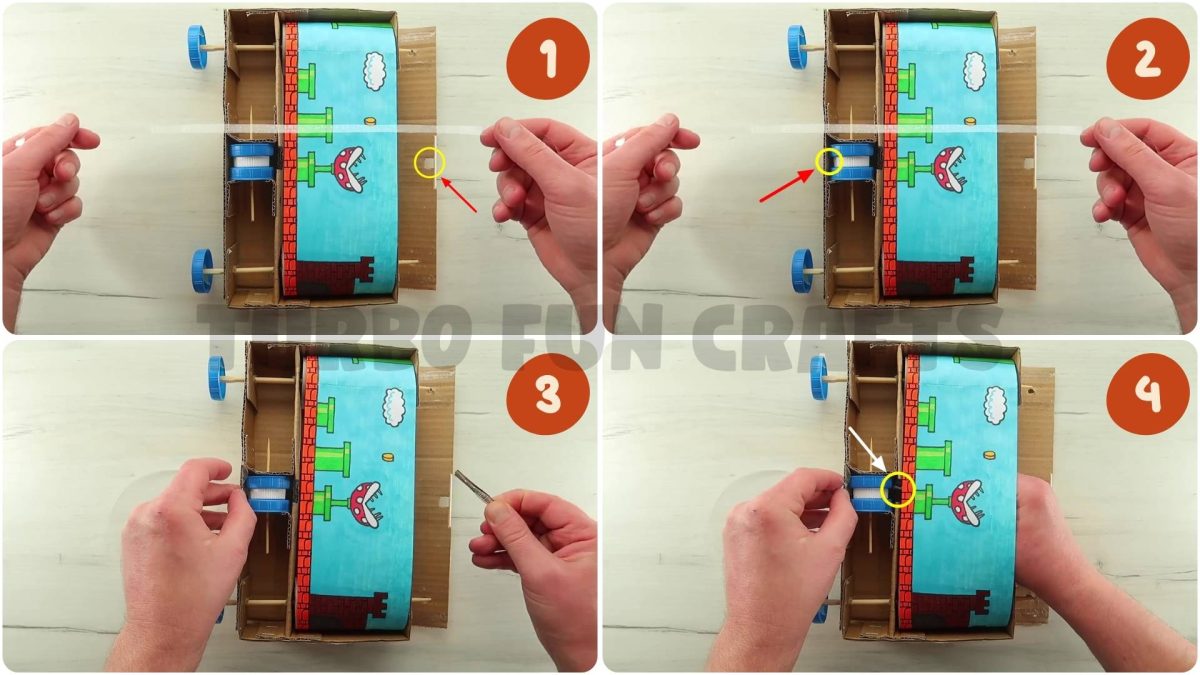
Now you need to insert the end of the duct tape that you are holding in your right hand into the hole with the attached wooden stick. The hole is indicated in the image №2. Insert the end of the duct tape into the indicated hole (image №3). Rotate the box so that the open edge is on top (image №4). This is how it should look like:
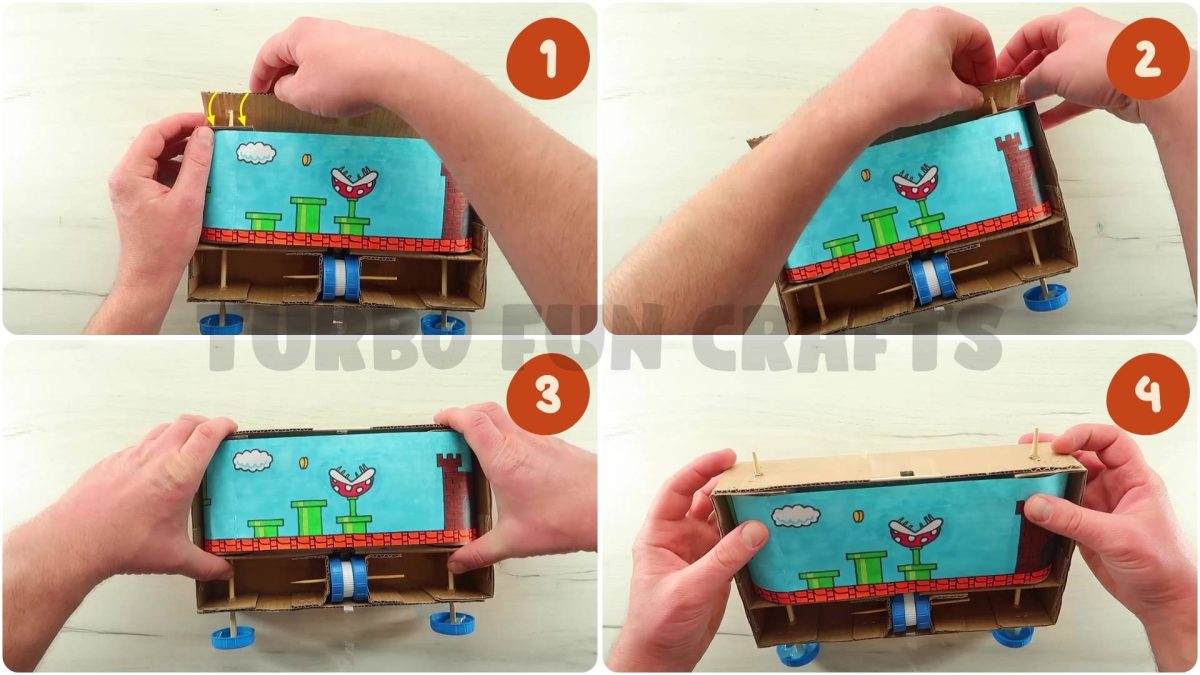
Start folding the top edge of the box. Insert the tapered ends of both sticks into the previously prepared holes. The corners of the box will be glued with double-sided duct tape previously attached. For added reliability, they can be additionally fastened with a stapler. This is how it should look like:
STEP 14: How to Make a Cardboard Game Super Mario
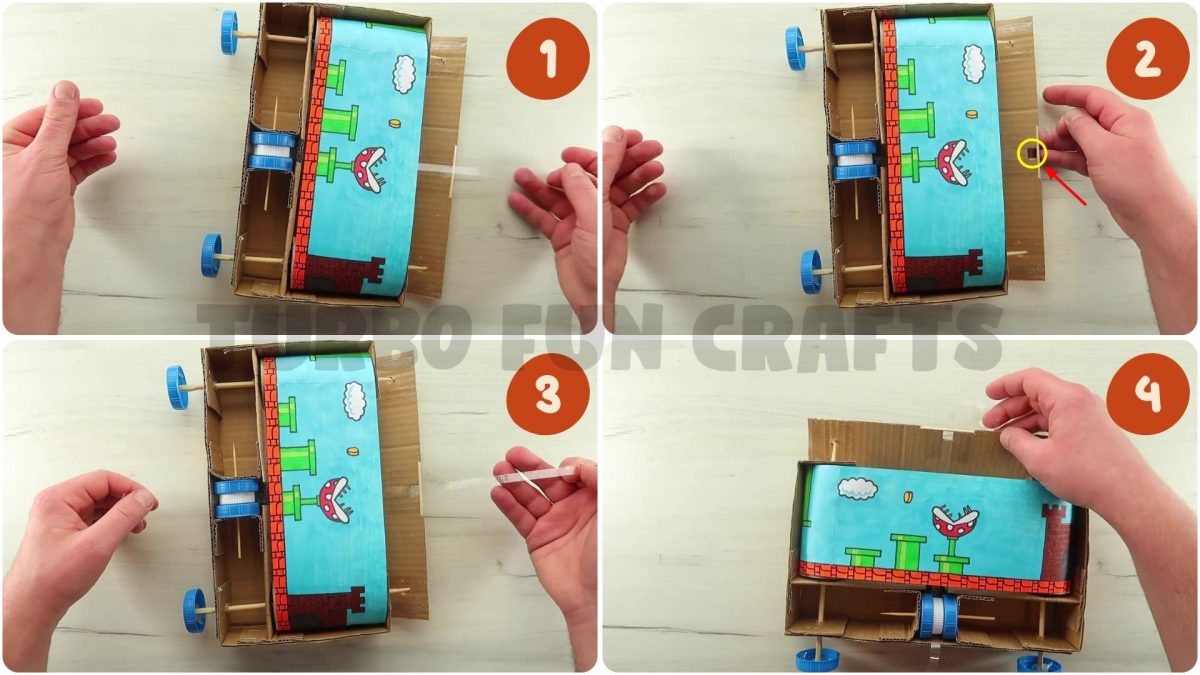
Stick together the ends of the duct tape using a piece of wider duct tape (image №1). Draw a Mario character on a sheet of paper or cardboard and cut it out (image №2). Now, you need to attach the Mario figure to the strip of duct tape as shown in the image №3. For this, you will need double-sided duct tape. Cut a small piece of double-sided duct tape and stick it in the indicated location (image №4).
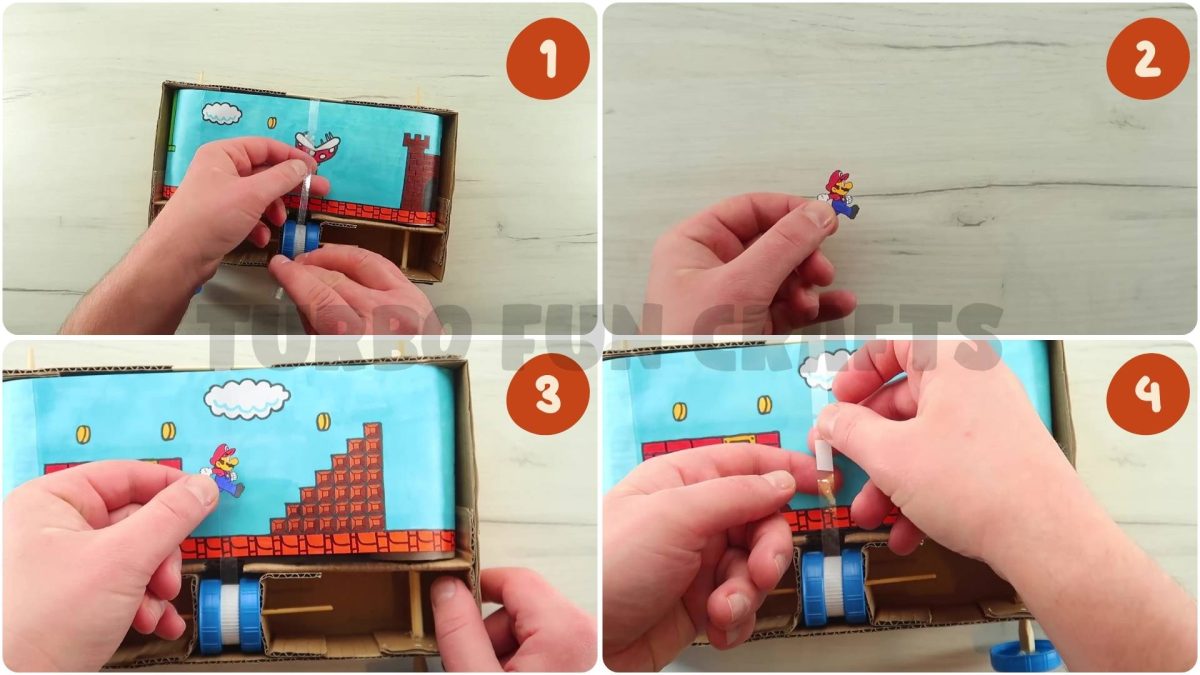
Remove the protective paper layer from the double-sided duct tape and stick the Mario figure on it (image №1). Make sure that the Super Mario figure moves freely up and down. To do this, try turning the roller up and down (images №2, №3 and №4).

Now it’s time to cover the box with the top part prepared earlier. The necessary shape and dimensions of the top cover of the box were indicated in “STEP 3”.
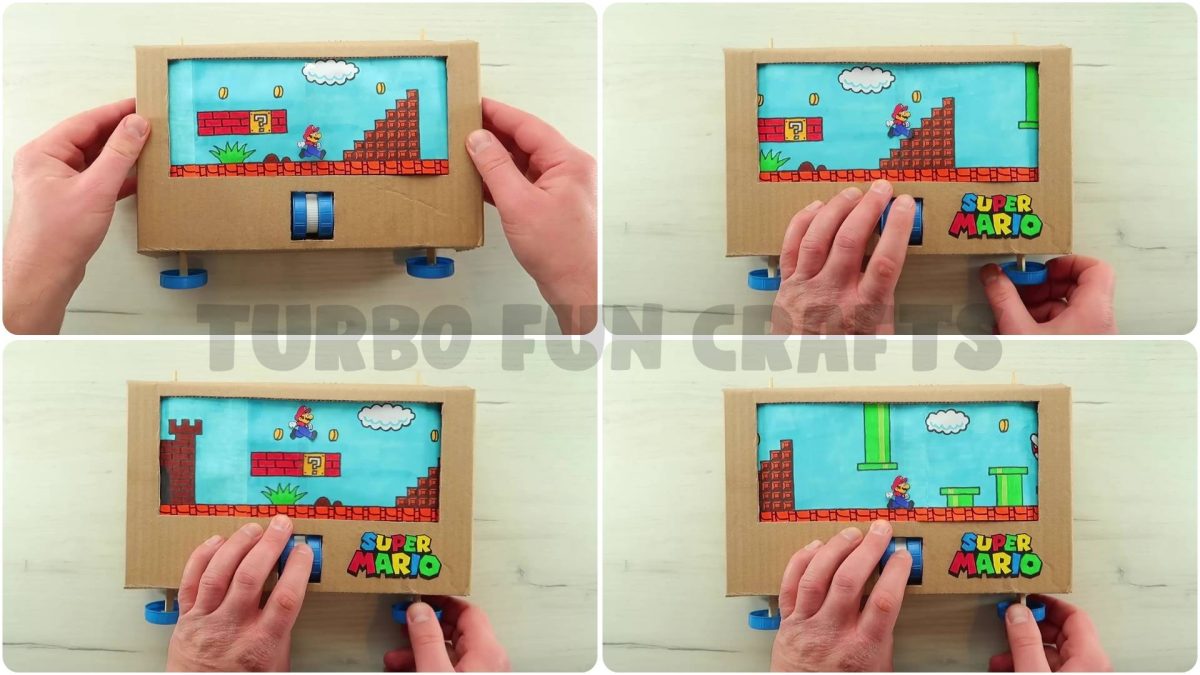
Playing this game is very simple: rotate one of the caps attached to the chopsticks to drive the game board, and rotate the roller in the center to move Super Mario up or down.
Let’s start playing!
If you experienced difficulties with some steps, you can watch the video instruction of how to make a Super Mario Game from Cardboard
Please scroll down for the video tutorial 🙂
Creating a Super Mario Game from Cardboard is a great way to unleash your creativity and have fun, without the need for any electronic components.
With just a few simple materials and some creativity, you can create your own Cardboard Game Super Mario with no electronic components that is sure to impress your friends and family!
Making a Super Mario Game from Cardboard is also a great way to relive the nostalgia of the classic video game. It can bring back fond memories of playing Super Mario as a child and provide a sense of satisfaction and accomplishment when you finally complete your own DIY version.
Overall, making a Cardboard Game Super Mario is a fun, affordable, and rewarding DIY project that anyone can enjoy. Whether you’re a beginner or an experienced crafter, it’s a great way to unleash your creativity and imagination and have a great time doing it!
Have Fun 🙂